You are currently browsing the archives for the Lock Repair category


Low Voltage Detective Work


Finding the Current Drop


As electric locking systems become increasingly complicated, troubleshooting these systems has also become more complex.  Yet certain basic principles always apply.

Case in point, a customer had access control on a stairwell door using a fire rated mortise exit device with an electrified mortise lock.  The solenoid in the mortise lock had burned out twice and the third one, newly installed, was already too hot to touch.  Granted, a solenoid operated fail safe device used in a continuous duty application will get warm, but it should not get too hot to touch.  So they called me to help them figure out what was going on.

To find the problem, I first listed the possibilities:

  1. They had gotten three defective solenoids in a row
  2. The power supplied is the wrong voltage – if the voltage was either too high or low, that would cause the solenoid to heat up
  3. The current supplied is inadequate – the solenoid used 330mA.  If it were being supplied with only 150mA, for example, the solenoid would heat up.

We determined that 27 volts DC was available at the door to power the 24 volts DC solenoid – perfectly acceptable – and we all felt that it was rather unlikely that they had received three defective solenoids in a row.  So that left current drop.  Where was the current going?  What was preventing it from getting the current it needed?

The access control tech on site could not determine whether the solenoid was getting enough current at the door by using a meter (for whatever reason) so we traced the current back through the line.

The power supply was a 6 amp, 24 volts DC power supply that had an output board with 8 fused outputs.  If all were in use, then a max of 750mA should be available from each output, provided they all were carrying the same amperage load.  We determined that four of the outputs were being used:  three were used to power electric strikes at 300mA and one was used to power the electric mortise exit device at 330mA.  The sum of the current draw for all devices attached to the power supply was therefore about 1.2 amps – well within the power supply’s capacity.  Therefore the power supply size was not the problem.  The technician measured the output from the contacts that were connected to the mortise lock and found that they were outputting correct voltage and current.  Therefore the output board was not the problem.

Assured by the technician that the wire run between the power supply and the mortise lock was less than 100 feet and that 18 gauge wire was used, I knew that the wire run was not the problem.  I asked how power got from the door frame through the door and into the mortise lock.  The technician responded that power transfer was accomplished by use on an electric hinge.

Typical wire gauge in an electric hinge is 24 gauge – a thin wire to be sure, but since power only needs travel a few inches through it, hinge wire gauge is usually not a problem.  But this electric hinge had its own 3-foot wire lead threaded through a raceway in the door to the mortise lock.  Whereas a few inches of 24 gauge wire might not be a problem, I reasoned, three feet of it might be a problem.  We talked about it briefly and then agreed that they would give it a try.

To my dismay, they called back two hours later – after they had replaced the wire running through the door with 18 gauge wire and let the mortise lock run on it for a while – and let me know that this did not work either.

The answer finally came when I asked how the electric mortise lock was connected to access control and was told there was a controller in a box above the door.  The controller used a form C relay to turn the electric mortise lock on and off.  I suggested that the technicians check the relay to make sure it was working properly.  When they did they discovered that the electric mortise lock had been connected in series with another device.  This other device – whatever it was – drew enough current to deprive the mortise lock of the current it needed to operate without burning up.  Problem solved.

The moral of the story is that, yes, access control has only gotten more complex as time goes by, but by using simple, logical methods a good technician and figure out and repair most problems.  So stick with it and keep asking questions until you ask the right one.


And good luck!


When Your Key Won’t Turn

Someday you might come home or go to open up your business and find that your key won’t turn at all, not even a little. There are several reasons this might occur.

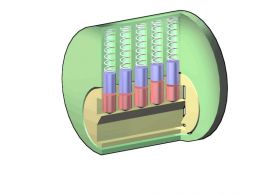
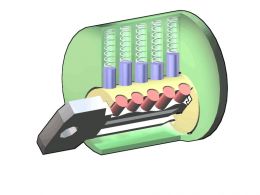
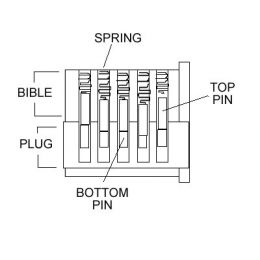
At right, illustrations show the operation of a standard pin tumbler lock. When you insert your key, the key raises the pins to the point where the division between the top pins and the bottom pins aligns with the division between the plug and the bible of the cylinder, allowing the plug to turn.

Sometimes dust and dirt collect inside the lock cylinder. When that happens the dirt can cause the pins to stick in a partially raised position, preventing the plug from turning. In most cases a spritz of dry lubricant will be sufficient to free up the plug and allow you to open your door. Simply spray the lubricant into the keyway and insert the key a few times to work the lubricant into the mechanism. If this method does not work you may need to use a more solvent-based lubricant like WD-40 to loosen the dirt. Locks exposed to the elements sometimes collect a lot of dirt.

If your key will only go in part way, this could still be the same problem, or there may be an obstruction in the keyway. Illumination of the keyway reveals that the bottom pins hang down into the keyway. In the event that lubricating the lock is ineffective, slide a thin piece of wire into the lock along the bottom of the keyway, avoiding the pins, and feel for an obstruction. If the piece of wire will not go in as far as the length of the blade of your key, there may be an obstruction present. At this point you might want to call a locksmith, however, you can gently work your way past the pins and try to go over the obstruction in order to try to coax it out. This process can take a lot of patience and skill, and it is possible to make the problem worse if you are heavy handed with the pins.

From Wikipedia

Should lubrication fail to free up your lock and you can find no obstruction, your lock may have a more serious malfunction, such as a pin chamber worn enough to allow a pin to get stuck at an angle, or a corroded pin that is frozen in place and will not budge no matter what. In these cases you need a professional to gain entry for you and repair your lock. If you succeed in freeing up your lock but find that the problem is reoccurring with increasing frequency, it’s probably time for you to replace your cylinder.

Door Problems

If the space between the door and the frame is different at the top than it is at the bottom, you've either got a door problem, or you're going to have a door problem.

As a locksmith I was called many times to fix what the customer thought was a lock problem only to find that the problem was with the door, not with the lock.   “What’s the difference?” you may well ask, proving to me that you are no locksmith.  “Well,” I would smugly reply, relishing my brief moment in the spotlight of useful knowledge.  “I’ll tell you.”  And I will, too.

Overview

Hardware and doors age together and develop different and sometimes incompatible symptoms of aging.  Like people, doors are subject to the prolonged effects of gravity.  Things start to sag, and for a while you can tighten things up and slow down or even perhaps reverse the effects, but eventually Newton will have his way and what was put up will come down.  That is to say the door, suspended an eighth of an inch (ideally) above the threshold, will eventually come to rest on that threshold.  If left to the ravages of time it will eventually cut a groove in the threshold.

Locks, meanwhile, start having trouble finding their strikes.  (A strike is to a lock what a tunnel is to a train or the side pocket to the eight ball.)  Usually (but not always) the strike stays put, but the lock travels downward along with the lock side of the door.  Eventually the lock may not line up with the strike at all, but before that there will be friction between the bolt or latch and the strike, making the lock difficult and eventually impossible to lock and/or unlock.

Besides sagging, wooden doors may warp and door frames of any construction may move as the building shifts and settles over time.  These changes may also result in locks that no longer line up and do not work properly.

Diagnoses and Remedies

The Sagging Door

Looking at the closed door from the ‘pull’ side, it is often easy to see if it is sagging.  If the jamb has not moved and was installed correctly, it is perfectly square.  Ideally there will be a one eighth inch gap between the top and the left and right edges of the door and the frame.  If the door hangs at an angle to the frame, it is probably sagging.

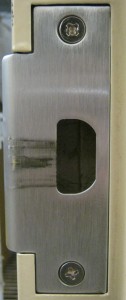
Marks on this ANSI 4-7/8 strike plate show that the latch has traveled down as it has traveled through time because of gravity.

If a door is sagging enough, there will be marks on the lock edge of the door where it is rubbing against the frame.

Often this is because the top hinge is loose.  If you tighten all the hinge screws this may solve the problem.  On a wooden door and/or frame you may find that the screws for the top hinge are stripped – that is, the screw hole has become enlarged because the weight of the door has pulled the screw out.  The solution for this situation may be longer screws.  Be sure you replace the screw with one of the same wire size so it fits flush in the countersunk screw hole of the hinge.  Commercial hinges use a size 12 screw, but bring one of the screws to the hardware store to match it up if you have any doubts.

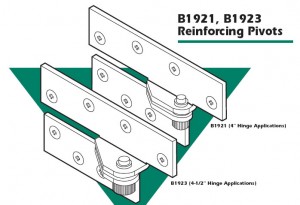
Many times longer screws do not solve the problem because the wood door is not solid would, but particle core or gypsum core, or the frame is shimmed out from the studs so far that that there is nothing for a screw less than five inches long to grab.  In this case it might be necessary to relocate the top hinge (not generally a good result), install an additional hinge or hinges above and/or below the existing top hinge, install a reinforcing pivot hinge at the top of the door, or replace all the hinges with a continuous hinge.

Damaged Hinges and Crooked Door Jambs

If hinge tightening does not solve the problem, the hinge or hinges may be bent or the door frame may have shifted.

Hinges are often bent when someone (who is not too bright) places a piece of wood between the door and the frame to hold the door open.  It is possible to bend a hinge back to almost its original shape, but when it is bent the metal of the hinge is fatigued and it will never be the same.  Since hinges vary by manufacturer, it is best to replace all the hinges if one is bent unless you can find an exact replacement for the bent hinge.

If the hinges are neither loose nor bent, the door frame may be out of alignment.  Use a carpenter’s square to check the corners of the frame and a level to check the legs and header.

If it is a three-piece, knock down hollow metal frame in a sheet rock wall, you may find an adjustment screw at about eye level on each leg of the frame.  These vary widely between door manufacturers, so see what kind of driver may be required to turn the adjusting screw.   You can experiment with the adjusting screw to see if turning one or the other either way has any desirable effect.  Sometimes the adjustment screws are not connected to anything that has contact with anything else.  In that case turning the adjustment screws will have no effect.

Hollow metal frames that are installed in interior sheet rock walls are often secured to the wall at the bottom of each leg with a screw.  If the floor has shifted beneath the frame so that one leg is now lower than the other, it is possible to remove the screws from both sides of the leg, gently pry the leg up off the floor a little and insert shimming material beneath the leg to hold it up.

Wooden Doors and Frames

Wooden doors and frames are generally susceptible to more movement than hollow metal.  In addition to sagging, there is warping, twisting and swelling that may occur.  Fortunately whenever finished wood rubs up against something, it tends to leave a mark.  These marks can tell you what the door is up to and help you fix the problem.

Unlike a hollow metal or Fiberglas door, you can plane a wood door down.  Careful, though:  make sure you iron out any hinge problems before you start to plane, otherwise you’ll plane, the door will sag more, you’ll plane some more, the door will sag some more – pretty soon you’ll have a big space between the frame and the door someplace and you won’t need a door viewer anymore because you’ll be able to see out the crack.

One has no choice but to plane a door that has swollen.  Plane carefully, a little at a time, and do your best to keep the door as square as possible.  After planing, finish the door with paint, polyurethane or varnish – especially the edges – so that it doesn’t swell again so fast.

This is not a complete list of door problems, but it is a good sampling.  I hope it serves as a starting point for you to solve your own.


Tags