You are currently browsing the archives for the door hardware category


Field Reversing the Precision E2203 SVR Exit Device

The Precision E2203 is a Surface Vertical Rod exit device with a solenoid in the head that controls the outside lever trim.  Ordered complete with trim: part number is E2203 × 4908A, specify door width, finish, handing, fail safe or fail secure.  The right thing to do is to order it fail safe or fail secure and handed at the factory for your application. 

But… let’s say for the sake of this article that you ordered the device and did not specify handing or fail safe / fail secure. You might find yourself needing to field reverse the handing.  Here is what you need to know.

Handing

Changing the hand on the basic 2200 device is not very difficult, but changing the hand on the E2200 is fairly difficult, and requires skill, patience and … tape.
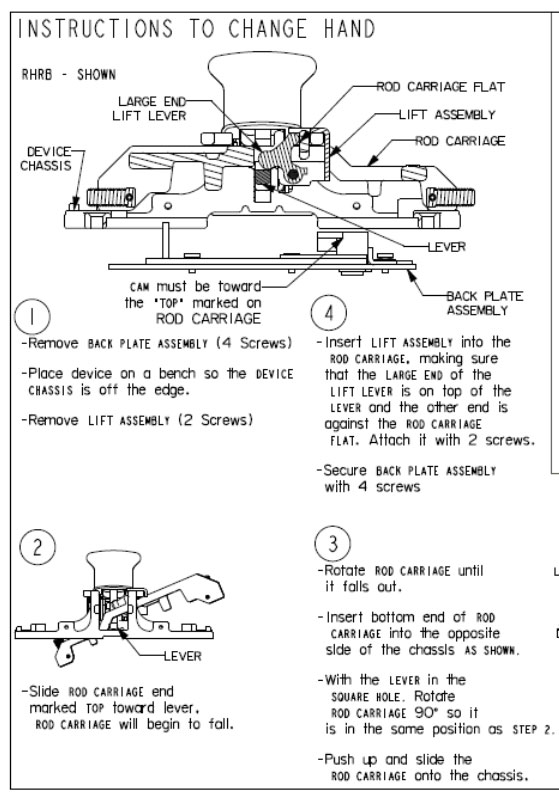
For the non-electric, purely mechanical version of this device, changing the hand is not as simple as it is with some other exit devices, for example, flipping the device over, but it is not all that hard to do.  Below are the directions for field handing excerpted from the 2200 Series installation instructions from the Stanley Precision web site.   Why they have arranged the steps to be followed in counterclockwise order is a mystery to me, but I am not here to judge, just inform.

At a glance you can see that there is some disassembly of the exit device head required to change the handing of the device. But when you add electrified trim control it complicates things a bit.

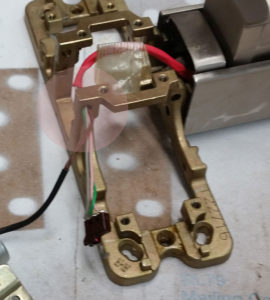
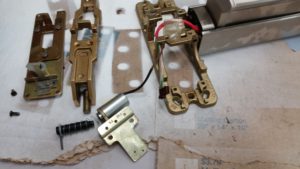
In the photo below you see the wires for the solenoid where they pass through the hole in the bracket.  That bracket is an integral part of the active head and it does not move.  However, the solenoid must be installed at the other end of the active head in order to interface with the working parts of the device and the wires are just long enough to allow it to be installed where it is.  There is no play in the wire that would allow the wire to remain where it is and yet allow one to move the solenoid.


In order to move the solenoid to the other side of the active head, one must either cut the wires (a nightmare, do not do it) or to completely disassemble the exit device, bar and all.

Why do you have to completely disassemble the exit device to pull the wire through?  Because it is taped to the baseplate of with a piece of filament tape that runs the length of the bar.  The tape must be removed to free the wire so you can pull it out through the hole in the bracket.

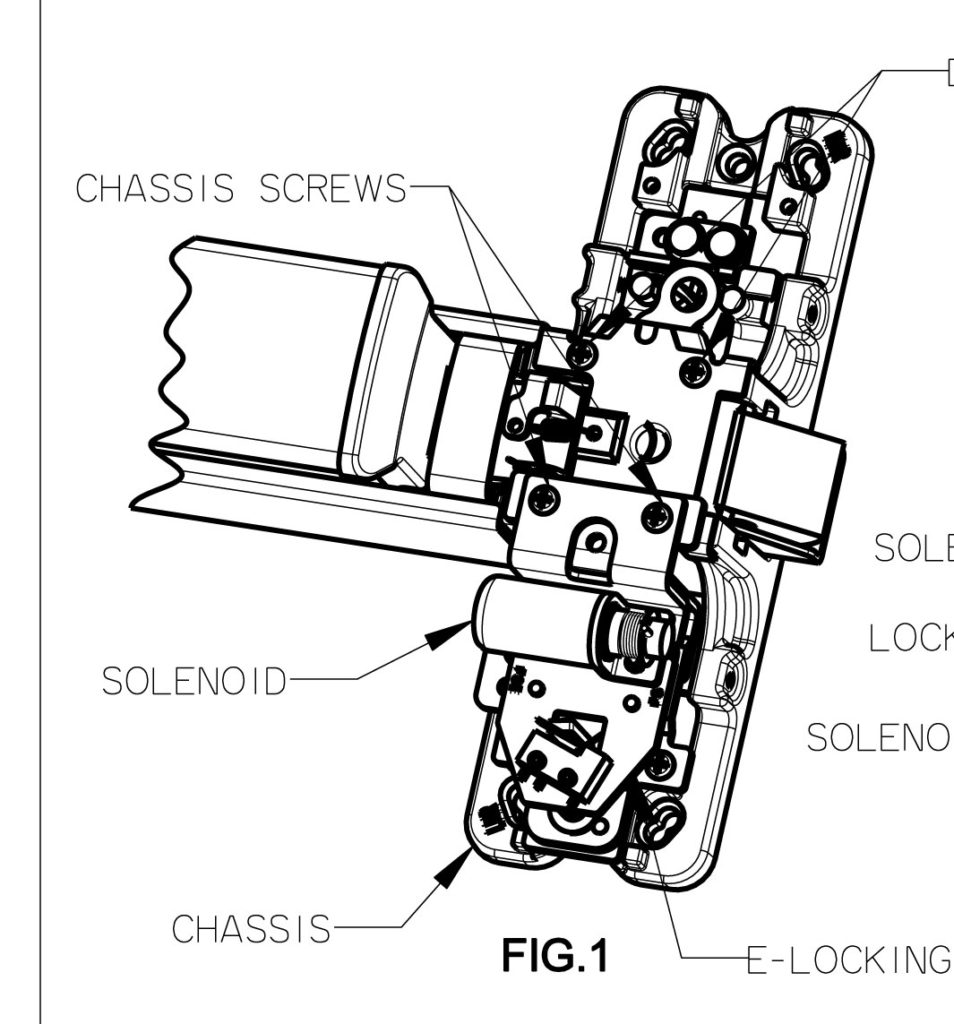
I could not find the directions for changing the hand of the E2203, but here is a drawing of the solenoid placement for the E2103 rim exit device taken from the installation instructions from the E2103 Kit.


Once you have pulled the wire through the hole, changed the hand of the head, taped the wire back down the length of the bar baseplate and reassembled the device, you’re done.

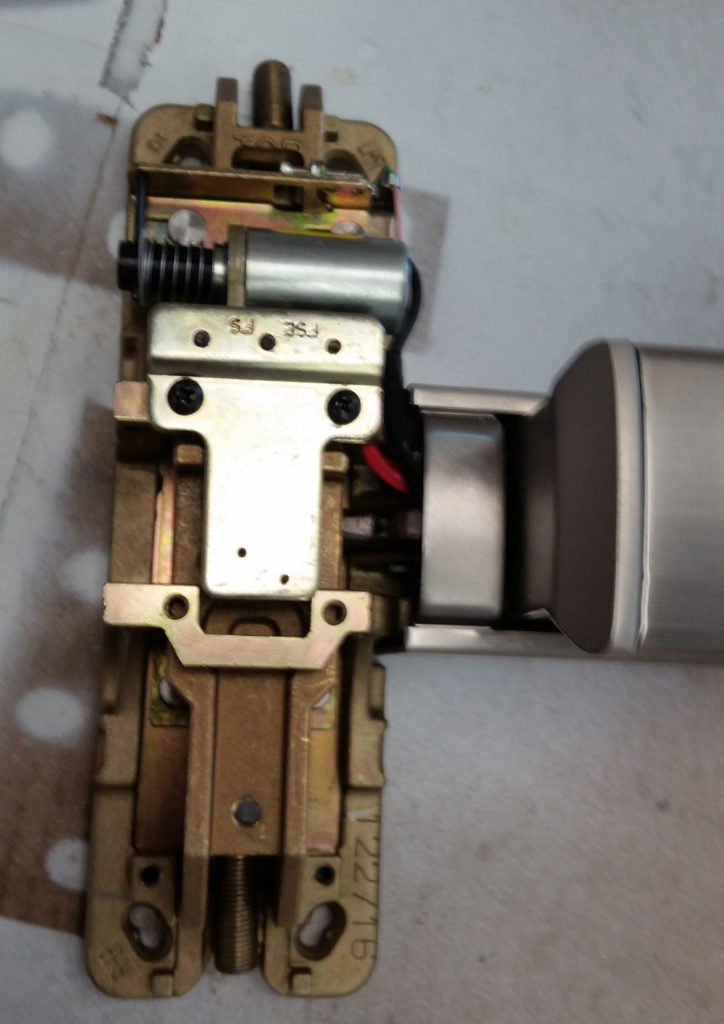
Below is a picture of the E2203 with handing freshly changed and the device reassembled and ready to install.


Like I said: order it fail safe or fail secure… AND ORDER IT HANDED.


locksnsafescom

Your source for quality security products with superior service!

Compatibility Issues

What’s wrong with this picture?

When specifying door hardware I understand that it can be like being an kid in a candy store.  But like that kid, you may not be able to always get everything you want.   Sometimes “this” might not go with “that.” There are some examples that should be obvious, such as fire rated exit devices with cylinder dogging, since fire rated exit devices must positively latch each time they close without exception and any kind of dogging could prevent that.  But other combinations of options are less obviously incompatible.

One elusive combination of exit device options that pops up sometimes is delayed egress with electric latch retraction.  In most electric exit devices this is almost a contradiction in terms because they use the same mechanism for delayed egress as they do for electric latch retraction, except it works the opposite way.  For example, the Von Duprin Chexit uses the same kind of motor that the Von Duprin EL devices use, except that the Chexit motor pushes out on the latch mechanism while the EL motor pulls in.  What would be necessary I guess would be to build a little transmission so one could shift gears from push to pull to switch from delayed egress to electric latch retraction and back again.

But since no one has yet invented this miniature transmission neither the Sargent Electroguard nor the Von Duprin Chexit currently offer both delayed egress and electric latch retraction in the same device.  The only device I have encountered so far that does offer these two options together in the same device is Detex.  There could be others.  Check with individual factories to be sure.

Two options that are offered together in many, but not all exit devices, with varying degrees of availability, are cylinder dogging and electric latch retraction.   For example, Sargent offers cylinder dogging with electric latch retraction, but only when factory installed.   Von Duprin offers “Special Dogging” (SD prefix) with electric latch retraction.  In this case the effect of cylinder dogging is accomplished by a cylinder operated latch holdback feature in the center case of the device.  (Not quite the same as traditional cylinder dogging.)  Precision can offer cylinder dogging and electric latch retraction in the same device without complication because their electric latch retraction and cylinder dogging mechanisms happen in different sections of the rail altogether.  Corbin and Yale offer devices with cylinder dogging and electric latch retraction in the same device.   Yes, the electric latch retraction and cylinder dogging combo is all over the charts when it comes to availability.


As in all facets of life, when in doubt, contact your friendly door hardware genius.


locksnsafescom

Your source for quality security products with superior service!

Von Duprin QEL Kit Diversity

qelhdqel

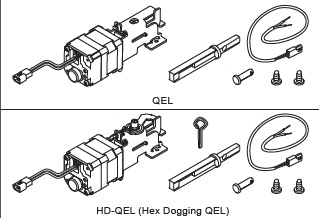
QEL and HD-QEL modular conversion kits.

Von Duprin offers several versions of its QEL (Quiet Electric Latch retraction) conversion kits for its 33, 35, 98 and 99 series exit devices.  The variations are:

  • Modular (no baseplate)
  • Modular, with connectors (Molex)
  • Modular with hex dogging
  • Modular with hex dogging and connectors
  • With baseplate, specify 3-ft. or 4-ft.
  • With 3- or 4-ft. baseplate and connectors
  • With 3- or 4-ft. baseplate and hex dogging
  • With 3- or 4-ft. baseplate, hex dogging and connectors

None of the modular kits come with baseplates.  Kits with baseplates offer a small ease-of-installation advantage because replacing the whole baseplate is slightly faster than field installing the modular kit onto an existing baseplate.  Modular kits can be installed in either 3- or 4-ft. devices, so if you want to have one kit on your truck, a modular kit would be the logical choice.

Which modular kit should you get?  I would suggest the HD-QEL Modular Conversion Kit with Connectors.  If you don’t want hex dogging, you can use a blank cover plate or plug the dogging hole in the existing cover plate.  If you don’t want the connectors, you can cut them off.  And since at the time of this writing there is no price difference between a modular kit with connectors and/or hex dogging, or without connectors and/or hex dogging, you might as well get the one with all the bells and whistles.  As I indicated, you can always dial it back.

While Von Duprin recommends any of their PS900 series power supplies together with their 900-2RS relay board to run their QEL devices, many installers are using their own power supplies and this seems to be working just fine.   QEL draws a 1-amp inrush.  I recommend allowing 2 amps for each QEL on a power supply, and it is always good to isolate them on their own set of contacts in the power supply if possible, using a power distribution or relay board.   If these contacts can be protected by a fuses or circuit breakers, so much the better.   A regulated and filtered power supply is also a plus.


Unlike many power supplies, I am both unregulated and unfiltered … and I like it that way.


locksnsafescom

Your source for quality security products with superior service!

Experiencing the New Von Duprin Chexit

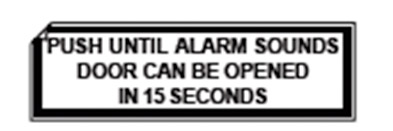
Chexit door label from Chexit installation instructions.

Von Duprin Chexit door label from Chexit installation instructions.

Last year Von Duprin began shipping Chexit self-contained delayed egress exit devices that are motorized instead of solenoid driven.  Since they are motorized, the new Chexits draw less current and will probably be more reliable than the previous solenoid-driven version. This means a less serious, less expensive power supply, less need for high capacity, high gauge, high cost wire and greatly increased workable wire run distances – all good things.

The new Chexit will do everything the old Chexit did, including release of the outside lever trim when the external inhibit function is activated by access control or another external switch.  That remains a way to get access control out of a Chexit by simply adding a blank escutcheon or other unlocked outside trim to the Chexit exit device.

As of this writing Exit-only function Chexit devices were being shipped less the part number 040193-00 cable used to connect the E996L to the Chexit PC board.  The cables are only provided if you order the Chexit from the factory with trim, but that is okay as long as you want to use no trim or non-electric trim.  Electrified trim is a means to provide fail secure access control from the trim side, so if the fire alarm goes off and powers down the Chexit, the fail secure electrified trim will stay locked.  Entry can still be gained by key.

On another note, recently I was involved in an application where the installer was replacing a mortise exit device and wanted delayed egress from the push side and free ingress from the pull side.  Luckily it was a mortise device, so all I had to do was provide a Chexit mortise exit device with blank escutcheon (passage function) trim because THE MORTISE LOCK ACTS INDEPENDENTLY FROM THE CHEXIT ON THE TRIM SIDE. Cool. 🙂

Bear in mind that  the Chexit remains active while people are using the passage function trim to get in, so if they happen to depress the touch bar, say by bumping it up against the wall for two seconds, they may activate the Chexit alarm.   Von Duprin Tech Support suggested a palm switch on the trim side to activate the inhibit circuit in the Chexit while a person enters from that side.


It was fun, easy, and I looked like a … Hardware Genius.

Door Hardware Triage

The Medical Metaphor

medicalAs previously published in Doors and Hardware Magazine, Feb. 2016

As in the medical profession, correct diagnosis of door hardware problems is wholly dependent upon the knowledge, skill and powers of observation of the person whose job it is to correct the problem.  “The devil is in the details,” they say, and it is never truer than when said in reference to doors and hardware.

Another old saying, “ignorance is bliss,” can be liberally applied to who those innocent building occupants and visitors who think that the answer to a lock that is not latching is to slam it until it does – or until the hardware falls off, whichever comes first.  Yet by the same token, door hardware technicians who fail to look at door hardware problems holistically are equally blissful.  If you have ever seen the latch hole in an ANSI strike enlarged to include half the head of the bottom mounting screw in order to remedy what is clearly a hinge problem you will understand what I am talking about.

The above occurs because the technician sent to solve the problem is guilty of treating the symptoms while failing to diagnose the disease.  He or she observes that the latch is making contact with the strike too low to drop into the strike hole as it should, but does not question why this is happening.  This example is a simple one, but the principle applies to more complex problems as well.

Method

A great way to make sure you correctly identify a door hardware problem on the first visit is to have a consistent method of examining the total opening.   An example follows:

  1. If possible, speak with the person who has reported the problem, or better yet, meet with them at the opening so that they can show you what the problem is.
  2. As you approach the door, visually check the gap around the edges of the door on the top and both sides.  (The gap should be one-eighth inch.)  If the gap is greater in one place and less in another, the problem may be a bent hinge or misaligned frame.
    Open the door.  How does it feel?  Does the door itself stick?  If it has a latch, is there resistance when you turn the lever to retract it?  Do the hinges groan or squeak?
  3. Inspect the door for dents and abrasions.  For example, scratches at the top of the lock-side edge may indicate bent or loose hinges.   Dents may indicate attempted forced entry:  check for damage to internal lock parts.  A dent in the gap between the door and frame above the top hinge may mean an object was placed there.  The frame may be damaged and/or the top hinge may be bent.
  4. Inspect the hardware for damage, missing parts and/or wear.   If it is a hollow metal frame, are the silencers installed?  If there are no silencers the door will not align properly and the lock will not latch correctly.  Is the door closer leaking?  Does the door closer arm move smoothly?  Are the hinge screws all present and accounted for, and are they tight?  If there is a latch, there probably is a drag mark on the strike.  Does the drag mark reflect correct alignment?

In other words, look at the door, the frame and the hardware thoroughly and completely, and always do it the same way.  That way you won’t fix one problem just to return the following week to fix another problem that you missed.strike
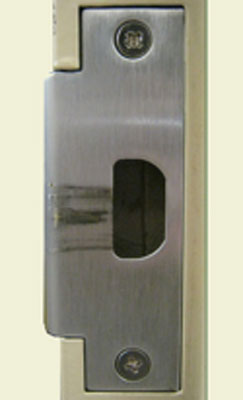
Tools May Be Required

To identify a door hardware problem you may find it helpful to use instruments or tools.   For example, a carpenter’s level can help you determine whether a door or frame is level or plumb quickly and accurately, and a carpenter’s square can show immediately if the frame is true or sprung.   A tape measure may be helpful to check if hardware is correctly located, whether or not the gap between door and frame is consistently one-eighth inch, and if one leg of the door frame seems to be longer than the other.

One problem most swiftly identified using a carpenter’s level is positive pressure.   If you detach the closer arm and tape back the latch on a door that is level, and it swings open seemingly of its own accord, chances are it’s a positive pressure issue.  Positive pressure occurs when the air pressure inside the HVAC ducts is greater than the pressure outside, causing air to be constantly forced out of the structure.  Positive pressure can be powerful enough to prevent a door closer from closing the door, and sometimes the only cure is when the HVAC technician changes the settings on the air circulation system.

The positive pressure issue is one of those door hardware issues that may require someone besides a door hardware technician to fix.

Waiting For The Electrician

Problems with electro-mechanical and electronic locking systems, like positive pressure issues, may require a low voltage or electronics specialist to solve in addition to a door hardware technician.  For liability reasons it is important to use technicians who are appropriately licensed as required in your locality.

Often these problems are due to mechanical as well as – or even instead of – electrical or electronic issues.  Therefore the best situation for electronic or electrical door hardware triage is when the technician called upon to fix a problem is skilled in all three disciplines. Out in the world we are finding locksmiths that have their low voltage electrical technician license and a working knowledge of how to troubleshoot or program an access control system, systems integrators who can disassemble and repair a mortise lock, and even electricians who can adjust a door closer or repair an exit device.

This is a phenomenon driven by a market that desires to have one technician who can do everything, both for convenience and economics.  In any event, a technician equally skilled in these areas solves the problem of cross discipline communication.  If you’ve ever had to explain the difference between fail safe and continuous duty electrified door hardware to someone who just does not get these concepts you will understand what I’m talking about.

For this reason alone it behooves one in the door hardware repair and installation business to learn as much as they can and get all the credentials they need to be able to service all the door hardware out there in today’s electric and electronic world.

Closure

The age of door hardware in which we work today is the age of the renaissance woman or  man, student of many skills.  However, diagnosing the often complex ailments of doors and door hardware takes more than skill and knowledge:  it requires mindfulness, openness, resourcefulness and humility.  It is not only necessary to know what could go wrong (and doubtless will, according to Murphy’s Law); it is necessary to be aware enough to observe all the symptoms, to be open to all possibilities and to be imaginative in creating solutions.  One must also have the humility to realize that it is not possible for anyone to know absolutely everything.  Sometimes the most useful tool at your disposal is your mobile phone.  A call to factory tech support can often save hours of fruitless aggravation.


No man is an island – but some men belong on one. 
The Pressure’s On

balloonPositive Pressure Issues

Sometimes doors are required to perform conflicting functions simultaneously.  For example, in order to comply with the American Disabilities Act a particular door may be restricted to a door closer that requires as little as five pounds of opening force.  This same door may be required to lock automatically without fail.

One solution could be to use a non-hydraulic, motorized power operator (automatic door opener) instead of a standard hydraulic closer.  Since many non-hydraulic power operators do not depend on a spring for closing force it is possible for them to have an ADA compliant opening force and also exert a closing adequate to close and latch the door.  Most power operators that fit this description must be installed by AAADM certified installers.

Without the magic fix of the non-hydraulic power operator, all a door technician can do is fine tune the door so that it swings perfectly and is perfectly balanced; fine tune the locks, hinges and door closer to peak performance under the opening force restriction; and pray there isn’t a positive pressure or wind issue.

One caveat:  deprived of electricity, a non-hydraulic power operator will neither open nor close the door.

Positive pressure HVAC operation is a prime example of how the intended function of a door can be impeded or prevented by the normal operation of building infrastructure.   Positive pressure in a building is accomplished by using the HVAC system to add air from outside the building to the air that is already in the building.  As with a balloon, the added air pushes outwards in all directions.  When an exterior door is opened, air flows out through the open portal, acting as an invisible barrier that keeps outside air out.

Unfortunately positive pressure acts like a constant wind pushing on the inside of the exterior doors.   Since almost all exterior doors swing out, the net effect of positive pressure HVAC on exterior doors is that of blowing to doors open and/or preventing them from closing.

The non-hydraulic power operator idea discussed above can usually solve the problem, but I have had some success adjusting door closers to compensate for positive pressure situations.  I have found that a slow swinging speed followed by a fast latching speed will often accomplish the mission.  This solution, however, can create other problems such as creating a wider time window for unauthorized persons to enter while the door is still shutting, for example.

I have found no reliable fix for an opening subjected to positive pressure that must comply with ADA reduced opening force requirements; however, since positive pressure on out-swinging doors inherently reduces opening force, there is some hope.

In the best of all worlds, door hardware technicians and HVAC technicians work together to coordinate positive pressure ventilation needs with security and ADA compliance requirements.

Excerpt from Tom’s article “Butcher, Baker, Door Hardware Technician… ” published in the February 2015 issue of Doors and Hardware Magazine, magazine of the Door Hardware Institute.

The Obsolete Mortise Lock

Nothing lasts forever.  Like manufacturers of other mechanical devices, lock companies periodically update their products to be consistent with current technology.  They do this to make better, safer, more reliable products, and also to remain competitive in the market place.

Sometimes these new, updated products are backwards-compatible with older models of the same brand, sometimes not.   In the case of mortise locks I can say with some confidence, mostly not.   One cannot replace a Schlage K series mortise lock body with an L series and expect the trim to work.  The same is true of the newer Sargent 8200 vs. the older 8100 and the Yale 8800 series vs. the previous 8700 series.  As these older locks age and must be replaced these differences can become a problem, since the existing trims and cylinders on site may not be usable with the new lock bodies.  And there are still plenty of these older lock bodies out there.  Case in point, although the Yale 8700 series was discontinued in 2006, one facility I know is filled to the brim with these mortise locks.

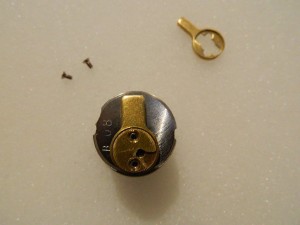
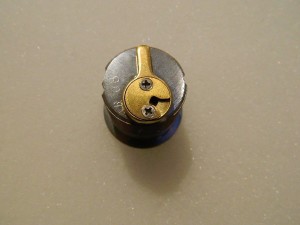
Although I foresaw that they would not be able to use the existing trims with their new locks I failed to anticipate that the existing cylinders would also be incompatible.  But they were and here is why.  On the left the cam that works with the Yale 8700 is in the process of being removed from a Medeco small format interchangeable core (SFIC) housing.  In the first picture below, the correct cam has been installed.

DSCN4430DSCN4432


In the second picture you can see that the new cam is not only thinner than the old cam, it’s also slightly longer.  There is no way that old cam is going to work.  Luckily, on a Medeco SFIC housing the cams are interchangeable, unlike most others on which the cams are permanently attached.


Please visit my friends’ site:

http://www.americanlocksets.com/mortise-locks-c-38_159.html


Now I’m waiting to hear about the other SFIC housings on the job that have their cams staked on. But one cluster at time, eh?

The Wrap-Around Door Reinforcer

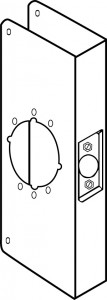
4CW2A wrap-around door reinforcer is a metal sleeve that slides over the door at the lock prep to conceal damage and/or reinforce the door.  They are a quick and handy solution when wood doors are damaged by forced entry and are often installed to strengthen new wooden doors against forced entry attempts.

In my experience a wrap does not really deter forced entry, but it does limit the damage done to the door.   I have found that when wood doors equipped with wrap around door reinforcers are burglarized, often only the wrap and the lock need replacing, not the whole door.   As with all door security hardware, if your lock is installed in a wrap-around door reinforcer and your neighbor’s lock is not, a would-be burglar may choose to break into your neighbor’s place instead of yours; however, this hypothesis is dependent on the highly dubious notion that a burglar is behaving rationally.  If the person were behaving rationally they would not risk their freedom and personal safety breaking into to somebody’s home to steal  their iPad or PC and selling it for chump change to their drug dealer.

Another benefit to using wrap-arounds is that they can act as a drill guide for lock installation.  Be careful, however, not to let the hole saw chew up the wrap.  Also, especially with stainless steel wraps, be sure not to let your drill bind up with the metal at high speed.  Injury would be likely.

Wraps are typically used on wooden doors, and while it is possible to use them on hollow metal doors, they never seem to fit quite right without a fight.  It seems that hollow metal doors measure exactly 1-3/4 inches thick whereas wood doors tend to measure closer to 1-11/16 inches.  Variations in door thickness affect the way a wrap will fit (or not fit) on a door.

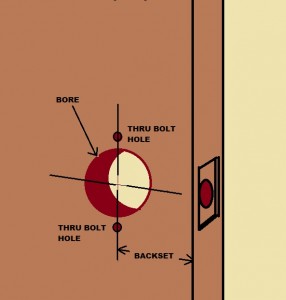
A wide variety of wrap-arounds have been created to accommodate various locks and conditions.  Don Jo Manufacturing currently carries the largest assortment, and if a new kind of lock by a major manufacturer emerges, they are pretty quick to design a wrap for it.  To get the right borewrap for your application you need to know:

  • Door thickness
  • Size of the wrap you want
  • Diameter of the lock bore
  • Backset
  • Finish
  • Through-bolt holes (yes or no)

(see illustration)

Standard door thicknesses for wraps are 1-3/8 inches and 1-3/4 inches.  Some models of wraps are available thicker doors.   Wraps come in a variety of heights, but height is usually determined by the kind of lock the wrap is designed for and the backset.  See the illustration for bore, through-bolt hole and backset details.

For other wraps you may need other dimensions.  For example, Don Jo makes a number of wrap-arounds for interconnected locks and these (naturally) have two bores cut in instead of one.   If you need a wrap for a mortise lock you may have to change the trim on the lock to make it work, or you might have to drill lever, cylinder and thumb turn holes into a blank wrap to customize it to the lock you have.  See my warning about hole saws and stainless steel above.  I earned myself sprained fingers that way once.

I used to joke about certain doors that they could use a door sized wrap.  Then some enterprising individual actually brought one by.  The idea didn’t go anywhere, as far as I know, but it was a good concept:  one wrap covered the door completely in sheet metal and another covered the frame.  Still, at that point why would one just buy a hollow metal door and frame?

And that about wraps it up.

Compact Electric Strikes

A common problem with installing electric strikes is cavity depth – that is, how deeply you need to cut into the frame (or wall) so that the electric strike will fit. For most of the twentieth century electric strikes were, and most still are, designed without consideration for this factor. Instead they are designed for burglary resistance and durability.

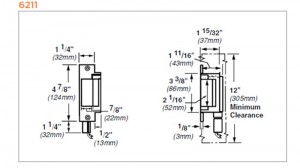
VD6211

Von Duprin 6211 Electric Strike

Click on  the dimensional diagram of the Von Duprin 6211 electric strike at right.   You can see that its total depth is 1-11/16 inches. All of its internal parts are heavy duty, and it has a heavy cast body and a thick, finished face plate. Most of the parts are individually replaceable. To install the 6211 in a hollow metal door frame, the dust box must be removed and often material inside the door frame – sheet rock, wood, masonry, whatever – must be removed in order to accommodate the strike. If the strike must be installed in a grouted door frame the installer is in for perhaps an hour’s worth of work that may involve a masonry drill, a 2-1/2 lb. sledge hammer, a masonry chisel and safety goggles.

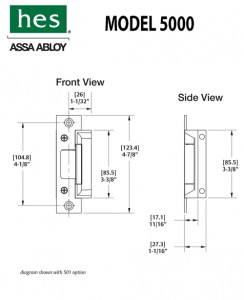
HES 5000 Dimensional DrawingsIn more recent years a new generation of low profile (shallow depth) electric strikes has become available, offering unprecedented ease of installation. The HES 5000 (illustration at left) was one of the first strikes on the scene to offer a depth of only 1-1/16 inches, and advertised that it could be installed without even removing the dust box from the frame. I have found it is usually much easier to knock out the dust box for wiring reasons, but it is true that the unit will fit neatly inside most original equipment dust boxes in hollow metal frames.

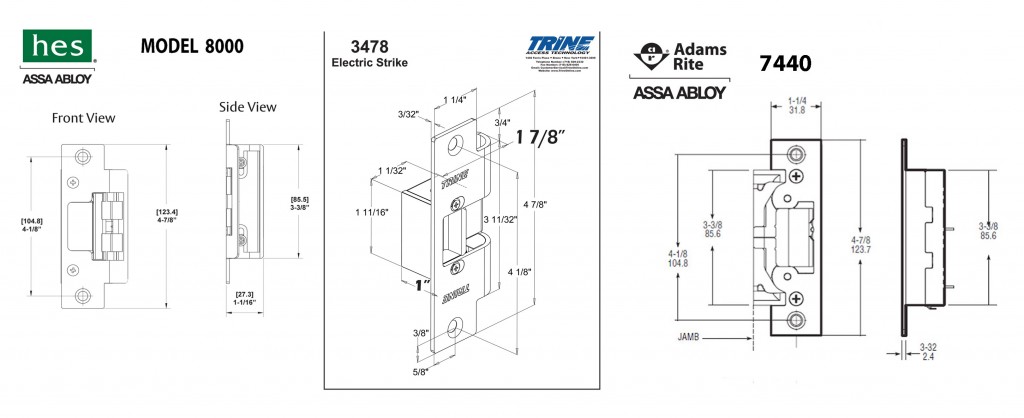
More recent offerings in the shallow depth electric strike department include the Trine 3478, the HES 8000 and the Adams Rite 7440, illustrations shown at the end of this article.  All are UL Listed burglary resistant. The HES 8000 offers 1500 lbs. holding force, the 3478 offers 1200 lbs. holding force and the Adams Rite, with its innovative double keeper design, offers 2400 lbs. of holding force.  The Trine 3478 offers an install with a very tiny lip cutout, and the HES 8000 offers the advantage of needing no lip cutout at all. Each of them fit in a strike cavity only 1-1/16 inches deep.

These strikes have revolutionized electric strike installation. Before, a good installer might install six or ten electric strikes in a day. Now a really fast installer might be able to install 20 or more, greatly reducing labor and other costs associated with installation.

What’s the Trade-Off?

None of the internal parts of these strikes are available. When these strikes break, you throw them away and buy new ones. Also they do not last as long. Whereas it is not unusual to see a Von Duprin 6211 or a Folger Adam 712 still in use after 10 or even 20 years, 6 years of service is a long time for a low profile strike. In ten years you might be replacing a spring or solenoid in a Von Duprin, but you might be installing your second or third low profile strike in the same door frame in that same amount of time. This is a small inconvenience.

Upon installing that third strike in the same hole, you probably will not yet have equaled the price of a single Folger Adam 712 or Von Duprin 6211. If price up front is the primary consideration, low profile is definitely the way to go. But if in about 12 years you are installing the fourth replacement strike in the same prep, those expensive, harder-to-install, heavy duty strikes start to look like a much better value.

strikethree

HES model 8000, Trine model 3478 and Adams Rite model 7440

Thank you.

Radius Corner Hinges

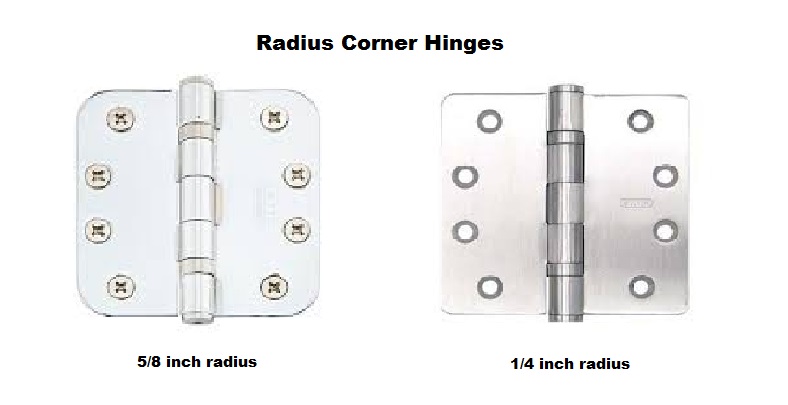
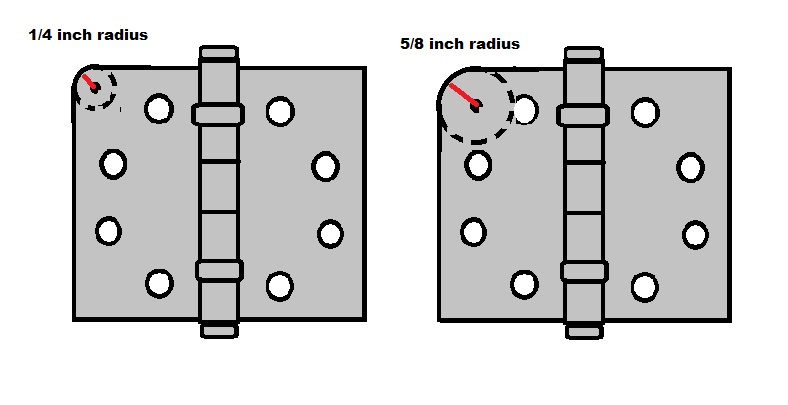
Colloquially known as round corner hinges, radius corner hinges are used mainly on residential doors but also in some commercial applications. In the United States radius corner hinges come in two curvatures: ¼-inch radius and 5/8-inch radius. The difference is easy to see when the different radius hinges are side by side as shown below.

Radius Corner Hinges


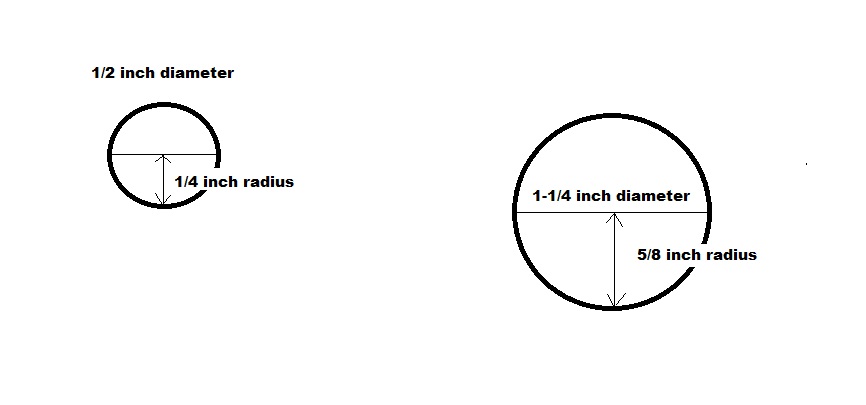
They are called radius corner because their degree of curvature is determined by the length of the radius of an imaginary circle.  The ¼-inch radius corner is based on the radius of a ½-inch diameter imaginary circle and the 5/8-inch radius corner is based on the radius of a 1-1/4-inch diameter circle as shown in the following illustration:

radii


When we superimpose the imaginary circles onto hinges we see how the length of the radius affects the curvature:

radii1


In these examples I show 4-1/2 inch x 4-1/2 inch ball bearing full mortise hinges.

For more about hinges, click here.  

Thanks for stopping by.


Tags