You are currently browsing the Door Hardware Genius blog archives


The Pressure’s On

balloonPositive Pressure Issues

Sometimes doors are required to perform conflicting functions simultaneously.  For example, in order to comply with the American Disabilities Act a particular door may be restricted to a door closer that requires as little as five pounds of opening force.  This same door may be required to lock automatically without fail.

One solution could be to use a non-hydraulic, motorized power operator (automatic door opener) instead of a standard hydraulic closer.  Since many non-hydraulic power operators do not depend on a spring for closing force it is possible for them to have an ADA compliant opening force and also exert a closing adequate to close and latch the door.  Most power operators that fit this description must be installed by AAADM certified installers.

Without the magic fix of the non-hydraulic power operator, all a door technician can do is fine tune the door so that it swings perfectly and is perfectly balanced; fine tune the locks, hinges and door closer to peak performance under the opening force restriction; and pray there isn’t a positive pressure or wind issue.

One caveat:  deprived of electricity, a non-hydraulic power operator will neither open nor close the door.

Positive pressure HVAC operation is a prime example of how the intended function of a door can be impeded or prevented by the normal operation of building infrastructure.   Positive pressure in a building is accomplished by using the HVAC system to add air from outside the building to the air that is already in the building.  As with a balloon, the added air pushes outwards in all directions.  When an exterior door is opened, air flows out through the open portal, acting as an invisible barrier that keeps outside air out.

Unfortunately positive pressure acts like a constant wind pushing on the inside of the exterior doors.   Since almost all exterior doors swing out, the net effect of positive pressure HVAC on exterior doors is that of blowing to doors open and/or preventing them from closing.

The non-hydraulic power operator idea discussed above can usually solve the problem, but I have had some success adjusting door closers to compensate for positive pressure situations.  I have found that a slow swinging speed followed by a fast latching speed will often accomplish the mission.  This solution, however, can create other problems such as creating a wider time window for unauthorized persons to enter while the door is still shutting, for example.

I have found no reliable fix for an opening subjected to positive pressure that must comply with ADA reduced opening force requirements; however, since positive pressure on out-swinging doors inherently reduces opening force, there is some hope.

In the best of all worlds, door hardware technicians and HVAC technicians work together to coordinate positive pressure ventilation needs with security and ADA compliance requirements.

Excerpt from Tom’s article “Butcher, Baker, Door Hardware Technician… ” published in the February 2015 issue of Doors and Hardware Magazine, magazine of the Door Hardware Institute.

The Obsolete Mortise Lock

Nothing lasts forever.  Like manufacturers of other mechanical devices, lock companies periodically update their products to be consistent with current technology.  They do this to make better, safer, more reliable products, and also to remain competitive in the market place.

Sometimes these new, updated products are backwards-compatible with older models of the same brand, sometimes not.   In the case of mortise locks I can say with some confidence, mostly not.   One cannot replace a Schlage K series mortise lock body with an L series and expect the trim to work.  The same is true of the newer Sargent 8200 vs. the older 8100 and the Yale 8800 series vs. the previous 8700 series.  As these older locks age and must be replaced these differences can become a problem, since the existing trims and cylinders on site may not be usable with the new lock bodies.  And there are still plenty of these older lock bodies out there.  Case in point, although the Yale 8700 series was discontinued in 2006, one facility I know is filled to the brim with these mortise locks.

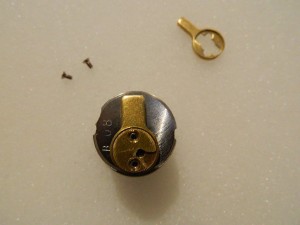
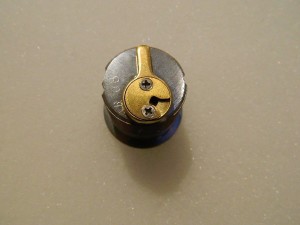
Although I foresaw that they would not be able to use the existing trims with their new locks I failed to anticipate that the existing cylinders would also be incompatible.  But they were and here is why.  On the left the cam that works with the Yale 8700 is in the process of being removed from a Medeco small format interchangeable core (SFIC) housing.  In the first picture below, the correct cam has been installed.

DSCN4430DSCN4432


In the second picture you can see that the new cam is not only thinner than the old cam, it’s also slightly longer.  There is no way that old cam is going to work.  Luckily, on a Medeco SFIC housing the cams are interchangeable, unlike most others on which the cams are permanently attached.


Please visit my friends’ site:

http://www.americanlocksets.com/mortise-locks-c-38_159.html


Now I’m waiting to hear about the other SFIC housings on the job that have their cams staked on. But one cluster at time, eh?

The Wrap-Around Door Reinforcer

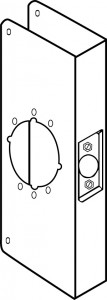
4CW2A wrap-around door reinforcer is a metal sleeve that slides over the door at the lock prep to conceal damage and/or reinforce the door.  They are a quick and handy solution when wood doors are damaged by forced entry and are often installed to strengthen new wooden doors against forced entry attempts.

In my experience a wrap does not really deter forced entry, but it does limit the damage done to the door.   I have found that when wood doors equipped with wrap around door reinforcers are burglarized, often only the wrap and the lock need replacing, not the whole door.   As with all door security hardware, if your lock is installed in a wrap-around door reinforcer and your neighbor’s lock is not, a would-be burglar may choose to break into your neighbor’s place instead of yours; however, this hypothesis is dependent on the highly dubious notion that a burglar is behaving rationally.  If the person were behaving rationally they would not risk their freedom and personal safety breaking into to somebody’s home to steal  their iPad or PC and selling it for chump change to their drug dealer.

Another benefit to using wrap-arounds is that they can act as a drill guide for lock installation.  Be careful, however, not to let the hole saw chew up the wrap.  Also, especially with stainless steel wraps, be sure not to let your drill bind up with the metal at high speed.  Injury would be likely.

Wraps are typically used on wooden doors, and while it is possible to use them on hollow metal doors, they never seem to fit quite right without a fight.  It seems that hollow metal doors measure exactly 1-3/4 inches thick whereas wood doors tend to measure closer to 1-11/16 inches.  Variations in door thickness affect the way a wrap will fit (or not fit) on a door.

A wide variety of wrap-arounds have been created to accommodate various locks and conditions.  Don Jo Manufacturing currently carries the largest assortment, and if a new kind of lock by a major manufacturer emerges, they are pretty quick to design a wrap for it.  To get the right borewrap for your application you need to know:

  • Door thickness
  • Size of the wrap you want
  • Diameter of the lock bore
  • Backset
  • Finish
  • Through-bolt holes (yes or no)

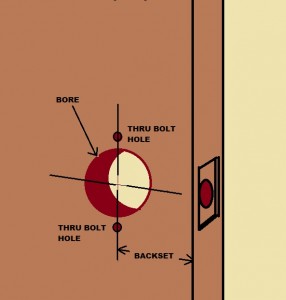
(see illustration)

Standard door thicknesses for wraps are 1-3/8 inches and 1-3/4 inches.  Some models of wraps are available thicker doors.   Wraps come in a variety of heights, but height is usually determined by the kind of lock the wrap is designed for and the backset.  See the illustration for bore, through-bolt hole and backset details.

For other wraps you may need other dimensions.  For example, Don Jo makes a number of wrap-arounds for interconnected locks and these (naturally) have two bores cut in instead of one.   If you need a wrap for a mortise lock you may have to change the trim on the lock to make it work, or you might have to drill lever, cylinder and thumb turn holes into a blank wrap to customize it to the lock you have.  See my warning about hole saws and stainless steel above.  I earned myself sprained fingers that way once.

I used to joke about certain doors that they could use a door sized wrap.  Then some enterprising individual actually brought one by.  The idea didn’t go anywhere, as far as I know, but it was a good concept:  one wrap covered the door completely in sheet metal and another covered the frame.  Still, at that point why would one just buy a hollow metal door and frame?

And that about wraps it up.

Compact Electric Strikes

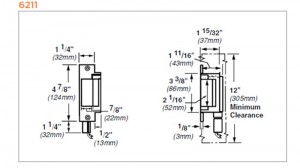
A common problem with installing electric strikes is cavity depth – that is, how deeply you need to cut into the frame (or wall) so that the electric strike will fit. For most of the twentieth century electric strikes were, and most still are, designed without consideration for this factor. Instead they are designed for burglary resistance and durability.

VD6211

Von Duprin 6211 Electric Strike

Click on  the dimensional diagram of the Von Duprin 6211 electric strike at right.   You can see that its total depth is 1-11/16 inches. All of its internal parts are heavy duty, and it has a heavy cast body and a thick, finished face plate. Most of the parts are individually replaceable. To install the 6211 in a hollow metal door frame, the dust box must be removed and often material inside the door frame – sheet rock, wood, masonry, whatever – must be removed in order to accommodate the strike. If the strike must be installed in a grouted door frame the installer is in for perhaps an hour’s worth of work that may involve a masonry drill, a 2-1/2 lb. sledge hammer, a masonry chisel and safety goggles.

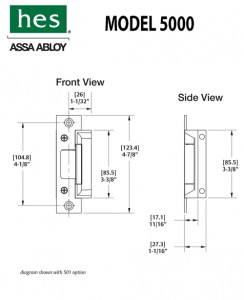
HES 5000 Dimensional DrawingsIn more recent years a new generation of low profile (shallow depth) electric strikes has become available, offering unprecedented ease of installation. The HES 5000 (illustration at left) was one of the first strikes on the scene to offer a depth of only 1-1/16 inches, and advertised that it could be installed without even removing the dust box from the frame. I have found it is usually much easier to knock out the dust box for wiring reasons, but it is true that the unit will fit neatly inside most original equipment dust boxes in hollow metal frames.

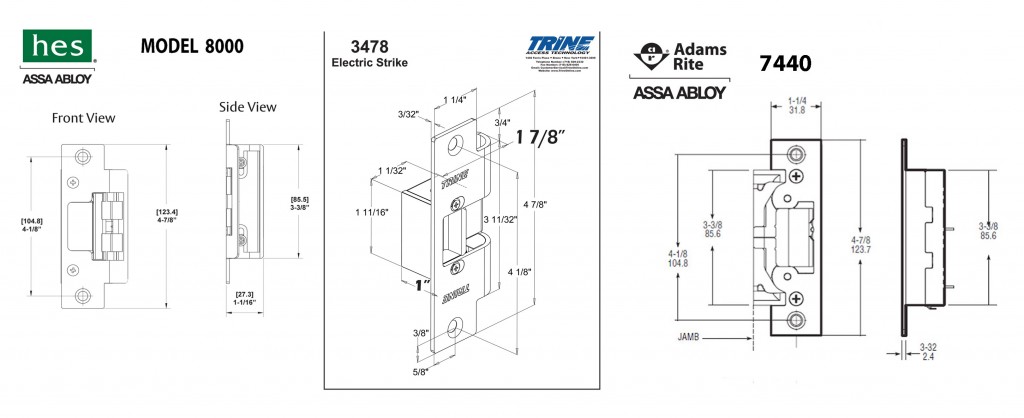
More recent offerings in the shallow depth electric strike department include the Trine 3478, the HES 8000 and the Adams Rite 7440, illustrations shown at the end of this article.  All are UL Listed burglary resistant. The HES 8000 offers 1500 lbs. holding force, the 3478 offers 1200 lbs. holding force and the Adams Rite, with its innovative double keeper design, offers 2400 lbs. of holding force.  The Trine 3478 offers an install with a very tiny lip cutout, and the HES 8000 offers the advantage of needing no lip cutout at all. Each of them fit in a strike cavity only 1-1/16 inches deep.

These strikes have revolutionized electric strike installation. Before, a good installer might install six or ten electric strikes in a day. Now a really fast installer might be able to install 20 or more, greatly reducing labor and other costs associated with installation.

What’s the Trade-Off?

None of the internal parts of these strikes are available. When these strikes break, you throw them away and buy new ones. Also they do not last as long. Whereas it is not unusual to see a Von Duprin 6211 or a Folger Adam 712 still in use after 10 or even 20 years, 6 years of service is a long time for a low profile strike. In ten years you might be replacing a spring or solenoid in a Von Duprin, but you might be installing your second or third low profile strike in the same door frame in that same amount of time. This is a small inconvenience.

Upon installing that third strike in the same hole, you probably will not yet have equaled the price of a single Folger Adam 712 or Von Duprin 6211. If price up front is the primary consideration, low profile is definitely the way to go. But if in about 12 years you are installing the fourth replacement strike in the same prep, those expensive, harder-to-install, heavy duty strikes start to look like a much better value.

strikethree

HES model 8000, Trine model 3478 and Adams Rite model 7440

Thank you.

Locks and Keys Grow Old Together

oldkeynewkyI never cease to be amazed when someone tells me their car won’t start and then they say,

“Well, it started yesterday.”

What sense does that make? I ask you.  Is today yesterday?  I think not.

Yes, indeed, time wears out almost everything:  clothes, human bodies, tree limbs, stones, car batteries … and locks and keys as well.

Keys and locks are for the most part both made out of brass.  Most pin tumblers are brass and most keys are either made of brass or ‘nickel silver,’ whatever that is.  Brass is a self-lubricating metal, producing verdigris as it oxidizes.  Nevertheless, as brass slides across brass again and again, particle by particle the substance of key, pin tumbler and lock cylinder are gradually worn away.

This manifests in several ways.  I’ve made a list of the most easily observable below:

  • The keyway gets larger, and the fit that was once pleasingly tight is now loose and sloppy
  • The key gets smaller, aggravating the sloppiness
  • The peaks are worn off the blade of the key, but his only affects the appearance of the key.  It is the valleys that are important.
  • The blade loses height because the bottom of the blade is worn
  • The plug gets smaller, allowing the upper and lower pin chambers to be at unintended angles
  • The bottoms of the pin tumblers, once rather pointed, become rounded, thereby shortening the overall length of the pin
  • Grooves are worn into the plug by the top pins

Eventually the old key that works relatively well in the old lock sits at an odd slant, its tip raised and its bow drooping because of the sloppy keyway and worn bottom of the key blade.  When one turns the key it twists in the keyway because the key is thinner than it once was, allowing all the pins to drop a little in their chambers.  But since the key and lock have been used together for so long, this one key may continue to operate the lock for a long time.

However, if one cuts a new key using the old as a template, the new key will likely not work well because it will not sit or twist the same way in the keyway.  If one attempts to decode the old key, one usually finds it to be a difficult task because keys tend to wear unevenly.  But even if a key cut true to the original manufacturer’s specifications is produced it will quite likely not work well in the worn lock, because it will not put the pins in the positions the metal of the lock has become accustomed to.

This tends to confound the user because the differences between the old key and the new are measured in thousandths of an inch and are not easily discernible to the untrained eye.   Locksmiths are then asked the question,

“Why doesn’t the key you cut for me work?  The original does.”

And when the locksmith suggests it might be time to buy a new lock, s/he may hear,

“But this lock has worked fine for thirty years!  And my key works great!”

Next, of course, they are likely to call you a bad locksmith, but there is no help for it if they won’t listen to the truth that their beloved lock, their venerable old daily friend, has outlived its ability to do its job, sad, but true.

The locksmith may enjoy some (albeit perverse) solace in the fact that eventually the key will stop working in the lock altogether, or will become so thin and frail that it breaks off in the lock, and at that point the user will realize that something has indeed gone amiss.  If it happens in the middle of the night, and the locksmith is on call, s/he may get substantially more than vindication out of the deal.

Hint: Vindication is not all it’s cracked up to be.

Radius Corner Hinges

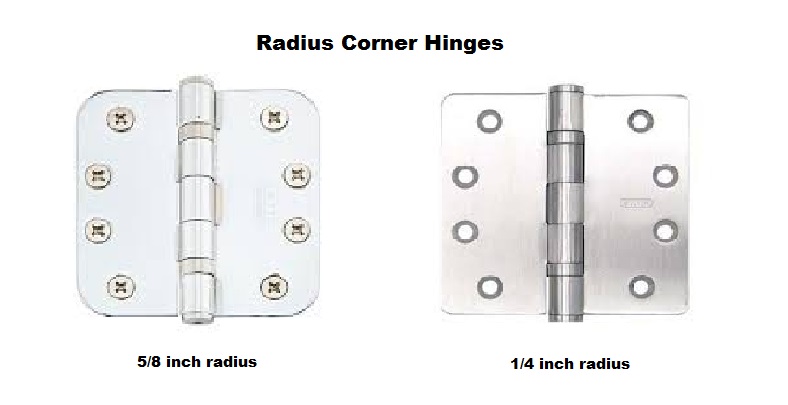
Colloquially known as round corner hinges, radius corner hinges are used mainly on residential doors but also in some commercial applications. In the United States radius corner hinges come in two curvatures: ¼-inch radius and 5/8-inch radius. The difference is easy to see when the different radius hinges are side by side as shown below.

Radius Corner Hinges


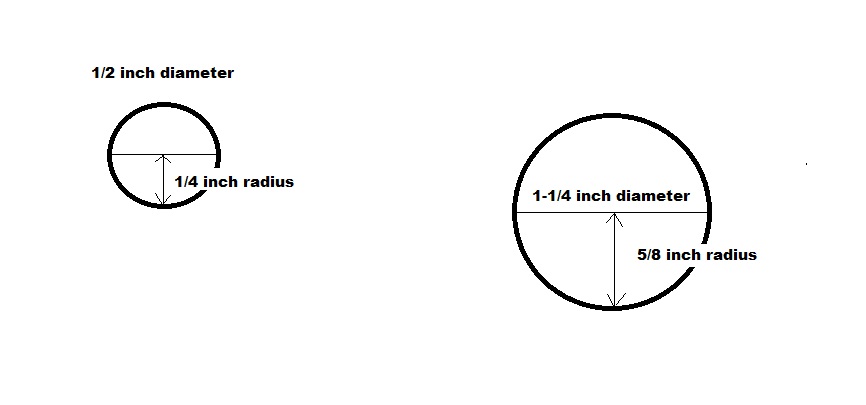
They are called radius corner because their degree of curvature is determined by the length of the radius of an imaginary circle.  The ¼-inch radius corner is based on the radius of a ½-inch diameter imaginary circle and the 5/8-inch radius corner is based on the radius of a 1-1/4-inch diameter circle as shown in the following illustration:

radii


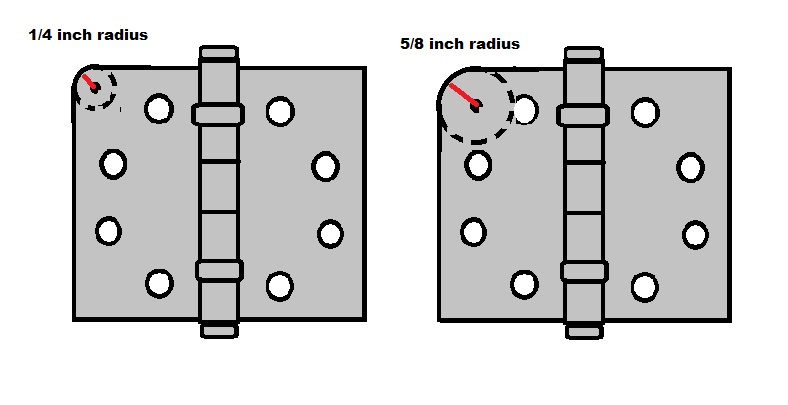
When we superimpose the imaginary circles onto hinges we see how the length of the radius affects the curvature:

radii1


In these examples I show 4-1/2 inch x 4-1/2 inch ball bearing full mortise hinges.

For more about hinges, click here.  

Thanks for stopping by.

Schlage CO and AD Series Mortise Lock Parts

Schlage AD Series

Schlage AD Series

This just goes to show that there is no substitute for field experience. In the quest to provide the best service to his customer, this locksmith went past my advice and the advice of factory tech support to find the best solution.

The locksmith inquired about a replacement latch for a Schlage CO200MS mortise lock. I called Schlage Tech Support and they said that there were no replacement parts available for that CO-200 Series mortise lock chassis; that the entire mortise chassis had to be replaced for a hefty sum and I relayed this info to the locksmith. The locksmith, however, knew that Schlage advertised that the CO series locksets incorporated the Schlage standard L-series lock chassis “for durability and dependability.” Based on this, the locsksmith took a chance, went to the parts list for the L-Series mortise lock with the same function and ordered the replacement latch. He reports that is identical and works fine.

Good to know! One can assume that many parts from the L Series mortise lock with the same function will work in all AD and CO series mortise lock bodies. Like I said, you learn something new every day.

Thanks for stopping by.

How to Order Door Hardware for Small Commercial Projects

This article is for facilities or property managers who need to buy hardware for change-of-use projects in which there is no architect involved.

On larger projects that involve build-outs or new construction, along with the doors architects usually specify the door hardware, often with the help of an Authorized Hardware Consultant (AHC).  On smaller projects wherein the services of an architect are otherwise not required, hardware choices often fall to you:  the facilities or property manager or owner.  This article will provide language and concepts that will facilitate communication between you and your hardware dealer and/or installer.

Get Good Advice

If you do not already have one whom you do business with, choose a qualified hardware installer.  I may be a little biased, but I think locksmiths make the best hardware installers.  Some contractors also have hardware installation specialists on staff who are qualified to do the work.  Experienced and qualified hardware installers can help answer your questions as you tackle this project.

Specifying the wrong hardware can be expensive, so your hardware choices can be very important.  In addition to your hardware dealer or qualified installer, your local building inspector and fire marshal can be invaluable sources of information.  They will be able to tell you, for example, if a particular door needs panic hardware and/or fire rated hardware.  Your qualified installer should also be able to help with these choices, but if there is ever a choice you are not sure of you can always consult these governmental authorities.


Know Your Doors

Number Your Doors 

Assign each door a number.   Stick a label with the door number on every door on the edge on the hinge side, just above the top hinge.   List the door numbers across the top of a spreadsheet.   Under each door number enter the existing hardware, door dimensions and other characteristics as discussed in the following sections.

Existing Hardware

Do a survey of the property and catalog every door, hinge, kick plate, door closer and lock.  Base your notes on the following categories of information in this article and you should be able to answer most questions your hardware installer may have without them having to visit.  You get two benefits from this:

  • Knowledge of what you have and what you want
  • Savings of time and therefore, money

List every hardware item on every door.  Be sure to open the door and look on both the inside and the outside.  Below is an illustration of some of the different kinds of hardware one may find on a door.
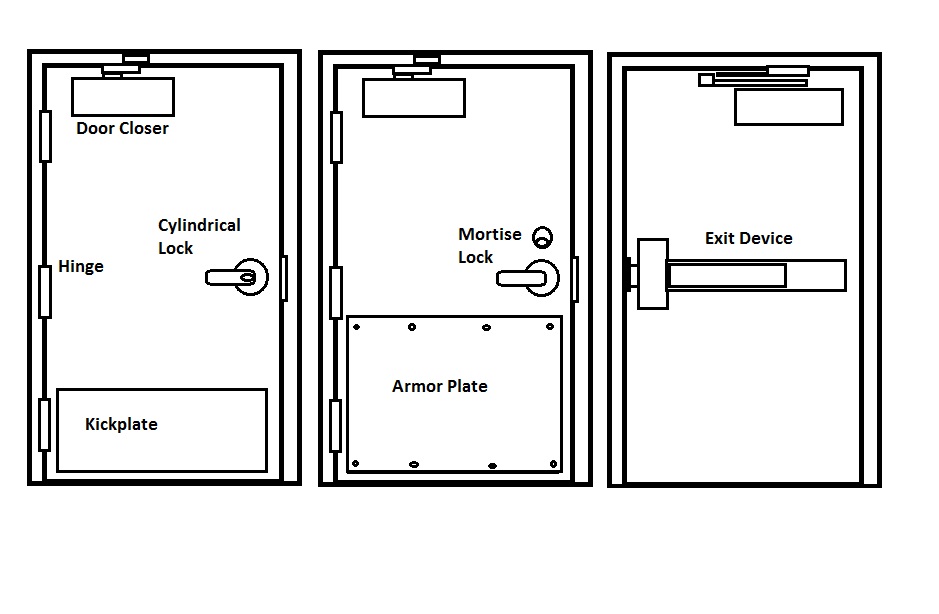
hardwaredoors

Don’t forget the wall or floor stops.

You may ultimately decide to reuse your existing hardware if it suits your intended use of the space and is in good working order.  You may need to rely on your hardware installer to help you determine what may be kept and what should be discarded.

Fire Rated vs. Non Fire Rated

Fire rated doors are designed to resist the spread of a fire within a structure.  Fire rated doors get their fire rating from Underwriters Laboratories and have a UL label on them showing the fire rating.  Only fire rated hardware can be used on fire rated doors if the fire rating is to be maintained and your project is to pass inspection.  Interior stairwell doors are always fire rated.  Other interior doors often may be fire rated as well.  Check all doors for fire labels; consult your local Fire Marshal if you are unsure.
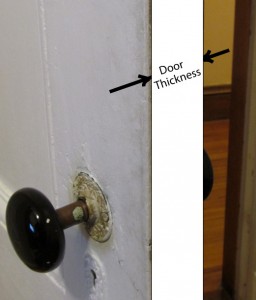
thicknessLocks for fire doors are UL listed as such and must positively latch whenever the door is closed.  Without exception, fire rated doors must be closed and positively latched in the event of a fire.   Therefore fire rated doors always have a door closer and some kind of UL listed latching device, such as a mortise lock, fire rated exit device or UL listed cylindrical lock.

Non-fire rated exit devices may have a “dogging” mechanism that keeps the push bar pushed in so that the latch(es) remain retracted.  Usually this is apparent as a small hole in the bar where a hex key can be inserted to dog the device down.  Sometimes the dogging mechanism is operated by a key cylinder.  If your device is equipped with any kind of dogging it is not a fire rated device.

Fire rated doors must be equipped to self-close.  This must almost always be accomplished through the use of a door closer.
Exterior doors are not usually fire rated, or if they are labelled may not have to comply with the positive latching rule.   Consult your local fire marshal or building inspector if you have any question.

Failure to comply with fire and life safety code can have expensive consequences so use extra care.
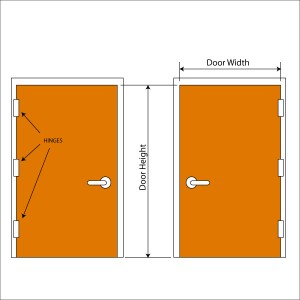
doordimensionsDimensions

Accurate dimensions of door and frame are vital when choosing door hardware.  Here are some common door measurements:

  • Width
  • Height
  • Thickness
  • Reveal
  • Stile width
  • Rail height

Door Width and height can be important when you are choosing a door closer or an exit device, and vital in complying with the American Disability Act (ADA) that requires openings to provide 32 inches of passage clearance.   This includes the space occupied by the open door.
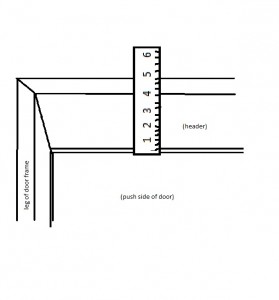
reveal

The Reveal.

Door thickness can be important when ordering door closers, exit devices and locks.  Reveal dimension is important for certain types of door closer installations.

As shown in the illustration below, the stile is the vertical part of a door that is made up of the components, stile and rail, whereas the rail is the horizontal part.  Most stile and rail type commercial doors are aluminum, although more and more of them are Fiber Reinforced Plastic.
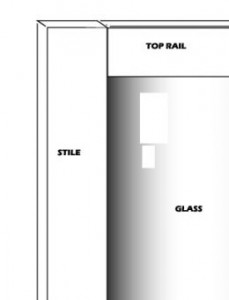
 

alumstileandrail

Stile width is important when ordering locks or exit devices.  Rail height is important when ordering door closers or electromagnetic locks.

Photos of doors are also good to have, but are not a substitute for accurate measurements.  

Handing

The “hand” of a door describes the direction it swings in relation to its hinges.  If you imagine yourself being the hinge, and your right hand is on the door while your left hand is on the frame (like the person in the picture), the door is Right Hand.
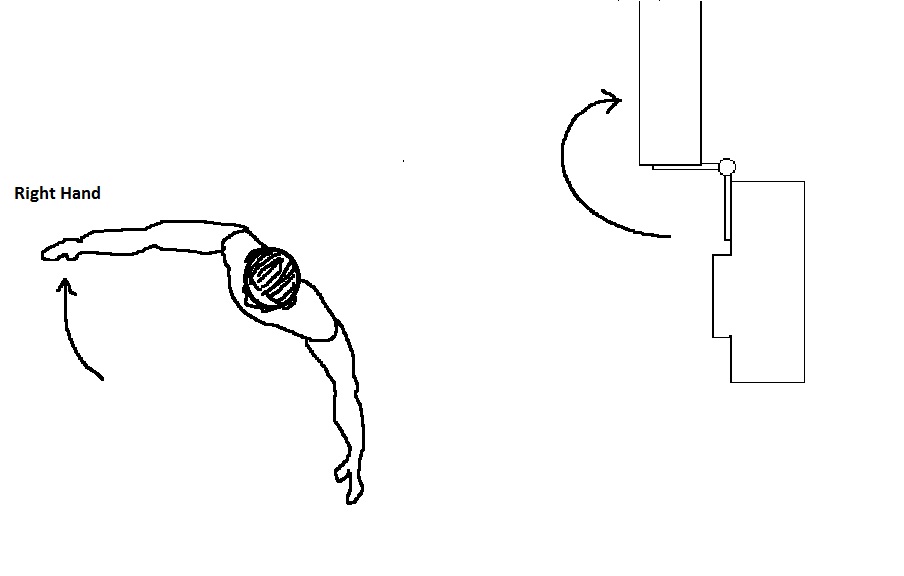
handingwithhands

His right hand shows that this is a right hand door.
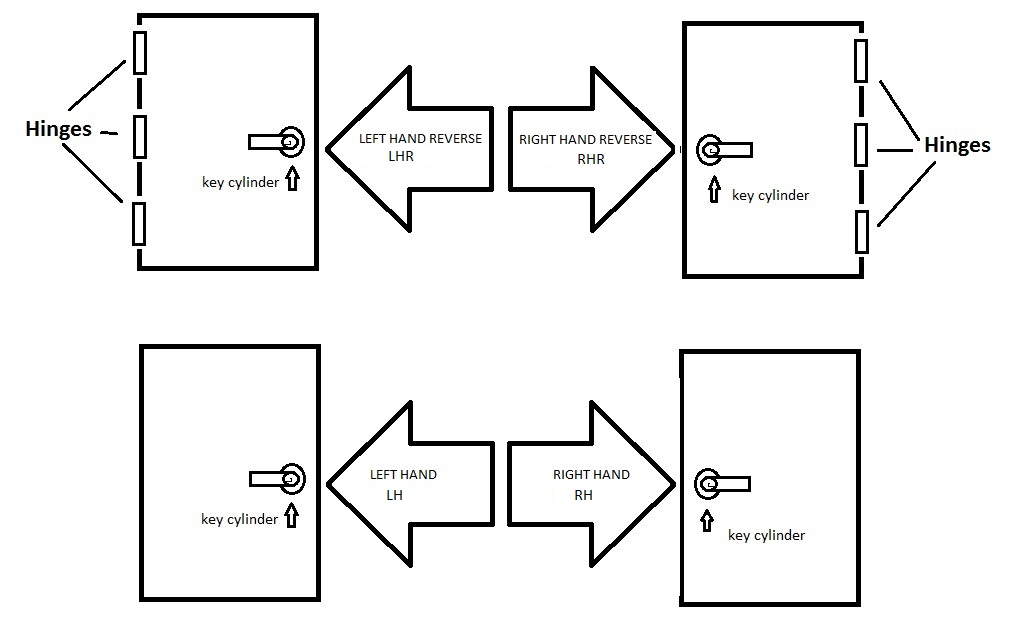
 

T-handing

Doors are always Left Hand (LH) or Right Hand (RH) however some locks can be Left Hand, Right Hand, Left Hand Reverse (LHR) or Right Hand Reverse RHR).   “Reverse” means that the locked side of the door is the pull side.  If a ‘reverse’ handed lock is installed on a Right Hand door, the lock is said to be Left Hand Reverse.  If it is installed on a Left Hand door it is said to be Right Hand Reverse.

All exit devices are reverse handed.

Location

The location of a door affects the hardware that can be installed on it.  For example, locking exterior doors in commercial facilities designed to accommodate a given number of people are usually required to have panic hardware – that is, an exit device with a push bar that goes across the door, the actuating portion of which must measure at least half the width of the door.   Most exit devices easily comply with this requirement.

All life safety code compliant buildings have a “path of egress,” that is, a clearly marked escape route in case people need to get out of the building in a hurry if, for example, the building is on fire.   Electrically lit exit signs are usually required to be placed along the path of egress to show people where they need to go.  Doors located in the path of egress are referred to as “egress doors” and are almost always required to swing in the same direction as the path of egress.

As previously discussed, while exterior doors are rarely fire rated, interior doors are often fire rated.  Fire rated doors need to be positively latched in the event of a fire, so if you are using exit devices with electric latch retraction, the latches must be extended in the event of a fire; if you are using fire rated electric strikes, they must be locked in the event of a fire.  Usually this is achieved (in both cases) through the use of a fire alarm interface relay, which is a device by which the fire alarm system can interrupt power to locking devices in the event of a fire.

Stairwell doors are unique in that not only are they fire rated – so they must be positively latched in the event of a fire – they must also usually be unlocked in the event of a fire.  This is all fine and good if locking the stairwell doors is not required, (passage function mortise or Grade 1 cylindrical locks or fire rated exit devices with passage function trim will all do the job just fine) but when access control is required the range of choices is limited.  Electric strikes cannot be used, but electrified fail safe mortise or cylindrical locks can be used as well as electrified fail safe exit device trim.  All such devices must be automatically unlocked by the fire alarm system as described above.

Composition

What is your door made of?  Doors made of different materials often require different kinds of hardware.

  • If a magnet is attracted to your door, then it is a hollow metal door.  Hollow metal doors are perhaps the most popular doors to be used in commercial facilities.
  • Is your door mostly glass with a relatively slim frame around it?  Then it is probably an aluminum storefront door.
  • Wooden doors are also common and used in all of the applications as hollow metal doors.
  • FRP (Fiber Reinforced Plastic) doors are also becoming more popular all the time, and they are available in different configurations to accommodate almost every application.

Lock Prep

Commercial hollow metal or wood doors are usually prepped one of three ways:

  • Blank – no prep whatsoever
  • 86 Prep – prepared for mortise clock
  • 161 Prep – prepared for cylindrical lock, 2-3/4 inch backset, with ANSI standard 4-7/8 inch tall strike
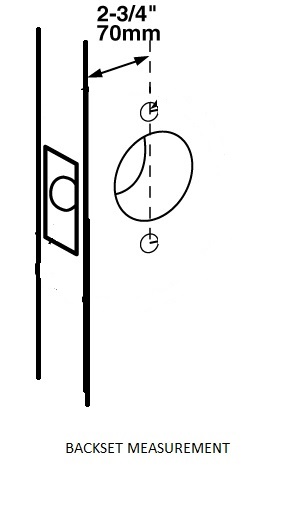
BacksetThe 161 Prep is a prep for a cylindrical lock.  It can be identified by a 2-1/8 inch diameter hole (called the ‘bore’) centered 2-3/4 inches from the edge of the door and a an opening in the edge of the door that is 2-1/4 inches high by 1-1/8 inches wide.  Centered in this edge prep is a 1-inch diameter hole for the latch.   The distance between the edge of the door and he centerline of the door is called the “backset.”

Most Grade 1 cylindrical lever locks have through-bolts that must be drilled outside the diameter of the 2-1/8 inch hole.  Then it is said that the lockset has through-bolts “outside the prep.”

Aluminum and glass storefront doors have specialized hardware.  Most hardware designed for other kinds of doors will not fit on a narrow stile storefront door, but may fit on a wide stile door.  Aluminum doors most commonly come with a prep for an Adams Rite MS1850S deadbolt.  Adams Rite offers other locks and exit devices that fit this same prep.

Locks

Lock Functions

There are many, many lock functions, but here are a few of the most common.  Common lock functions often correspond to door use or location.  Office doors are usually equipped with office function locks:  locks that can be locked from the outside only by key, but can be locked from the inside by pushbutton or turn knob.   Classroom doors get classroom or classroom security function locks.  Single occupant bathrooms get privacy locks and/or occupancy indicator deadbolts.  Janitors’ closets and storerooms are fitted with storeroom function locks.  Non-locking doors get passage function locks:  locks that are always unlocked from both sides.

Wherever you use an electric strike you will probably also use a storeroom function lock.  You will also need a door closer.

In order to comply with ADA requirements, all locks should be equipped with lever handles.  Check with your local building inspector to make sure your choice of lever design is ADA compliant.

Keying

Even if you intend to use electronic access control, your locks will probably still have keys.   To determine which key will open which door, determine who will have access to that door.  The more doors that are opened by the same key, the greater the convenience and the greater the security risk.  Therefore key control must go hand in hand with keying.

If you are only using keys for access and have an existing master key system, it is helpful to have access to the bitting list for your system.  If you do not have it on site, perhaps the locksmith who created the system still has it.  With the bitting list a locksmith can determine whether it is possible to add more locks (more changes, s/he would say) to your system and may be able to safely add changes without creating keys that open more than one door in the system.

There are software programs on the market that create master key systems, but unless you are a locksmith I suggest you leave the keying (and the software) to a locksmith.

If you are creating a new group within an existing system – for example, you are head of maintenance at a small college that is opening a new department within an existing building – and you already have an institution-wide master key system in place, you may want to create a sub-master key that opens all the doors within this new group.  This will be convenient, but remember to keep such a key in a safe place and be careful who you give it to.  This is the essence of key control.
In addition to your new sub-master key, it is wise to key doors alike only when they will always be opened by the same people.  For example your utility closets may only be opened by your maintenance staff, so you may want to key all your utility closets alike.  They will also be accessible via the sub-master and the existing master key.

The important principle here is to realize that you put locks on door to keep people out and you give keys to people so that they can get in.  Key control is making sure the people you want to keep out don’t get the keys and the people you want to let in do.

In addition to keying software, key control software is also available.  Usually, however, if you are creating a small group of, say, 25 doors or less, a simple spreadsheet or even a hand written ledger may be all you need to keep track of your keys.

Access Control

The same principle applies to access control, but the practice of access control is much simpler.  In access control you simply give everyone their own unique credential (magnetic stripe card, proximity card, pin code, etc.).  The access control system keeps track of who accesses which door and when.   You can have one credential open all the locks, but then you have to be careful who you give that credential to.  It acts as your master key.

One advantage of access control is that you will be able to tell who accesses what door and when.  If your project will house sensitive or expensive equipment or intellectual property, you may want the ability to keep records of the movements of people who have access to it.

Another advantage of access control is that you can change who has access to a given door without changing the lock.  Often one can add and delete users from any given door right from one’s desk using the access control system software.

Other Door Hardware

Hinges

There are many, many varieties of hinges.  On small projects I have found that the hinges and doors are often reused if they are in good working condition.  But hinges must be replaced if they are damaged or worn.  Take the time to identify and learn about the hinges on your job.

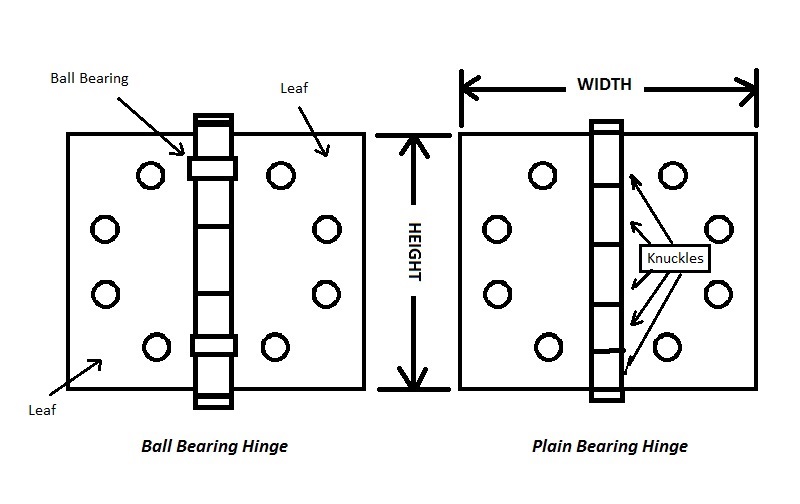
The overwhelming majority of hinges in the United States are one size, finish and configuration.  They are 4-1/2 inches high and 4-1/2 inches wide; they have ball bearings to reduce friction and increase life; and, by far, most of them are satin chrome plated steel.  They are full mortise hinges because both leaves are cut in:  one is cut (or mortised) into the frame and one is cut into the door.  These are called “butt hinges,” I’m not sure why.

The correct way to measure a hinge is [height] by [width] as shown in the illustration below:
HingeMeasure

You can check out my full article on hinges here.

Door Closers

I write of door closers at length elsewhere.

For your small commercial project you need to know how you want each door closer to behave on each door.  There are some limitations.  For example, you cannot have door closers with hold-open arms on fire rated doors unless they are electric and so can be released by the fire alarm.   If you restrict your use of hold-open hardware to exterior doors you will be completely safe from code violations, but this is not always practical.   Remember, therefore, that hold open hardware on fire doors must be releasable by the fire alarm panel and you should be okay.

As mentioned earlier, the reveal dimension of your header can affect whether or not you can use a closer mounted in top jamb configuration.  Other opening idiosyncrasies – arch top doors, transoms, odd widths – can also affect your choice of door closer.  My best advice is to take good measurements and consult with your qualified hardware installer.

Auto Operators

Also called power operators or automatic door openers, auto operators are growing more in demand every year as we move toward a more inclusive society.   These devices are potentially dangerous if specified or installed incorrectly.  Therefore if you need an automatic door opener your best bet is to hire an automatic door company.   Your second best bet is to have your qualified hardware installer choose and install a low energy power operator that is designed to exert less force, thereby presenting less of a potential hazard.

Auxiliary / Decorative Hardware

On most openings one finds a door stop.   The purpose of the door stop is usually to prevent the hardware on the door from hitting and damaging the wall, but sometimes it is used to prevent the door from opening too far.   There is a great variety of door stops designed to accommodate different conditions.

In addition to door stops there may be kick plates or other protection plates, door viewers, lock guards, surface bolts, metal numerals or letters, mail slots, or various and sundry other hardware items to serve a myriad of purposes.  Most of these items are fairly self explanatory.

Kick plates, armor plates and protection plates are measured like hinges:  height x width.

Review 

Once you have assembled the information and organized it by door number, review it as best you can for accuracy and completeness.   You can always go back and check if you have to.

  • Door dimensions, handing, composition and location
  • Whether or not doors are fire rated or non-fire rated
  • List of existing hardware and/or lock preps
  • Lock functions, design, finish and keying (and access control)
  • Hinge sizes and finishes
  • Door closer functions and finishes
  • Auto operators, if any
  • Auxiliary hardware required

Armed with this information you will be on good footing when you discuss the job with your qualified door hardware installer.  Best of luck with your project.

Identifying Door Hardware Finishes

There are many sources on the Internet that provide guides to door hardware finishes with brief descriptions. In this article I describe the most common finishes in more detail to try to make it easier for hardware specifiers and installers to identify finishes in the field.

The ‘finish’ of a piece of door hardware refers to its color and the degree to which it reflects light. These qualities are defined (more or less) by alphanumeric codes called ‘finish codes.’ I say ‘more or less’ because often there are noticeable differences in finish between pieces of hardware by different manufacturers and sometimes between pieces manufactured in the same factory at the same time. This is especially true of “living” finishes – that is, finishes that are designed to age naturally over time – such as US10B, oil rubbed bronze. More about that later.

In the United States there are two finish code systems: U.S. finishes, created by ANSI (American National Standards Institute) and BHMA finish codes (Builders Hardware Manufacturers Association). U.S. finishes describe only the color whereas BHMA finish codes describe both color and base material. The most notable exceptions to this rule are US32, polished stainless steel, and US32D, satin stainless steel.  These U.S. finishes describe both the finish and the base material.  The corresponding BHMA finish codes would be 629 for polished stainless and 630 for satin.

BHMA finish codes are different for different base metals. For example, BHMA 626 is satin chrome plated brass whereas BHMA 652 is satin chrome plated steel. Base metal can be important when choosing hinges for interior vs. exterior use. BHMA 632 (polished brass plated steel) finished hinges will rust whereas BHMA 605 (polished solid brass) finished hinges will not. Hinges in 632 finish are much less expensive than those in 605 finish, and it is absolutely fine to use them in dry interior environments.

A “polished” (or “bright”) finish is one that has been buffed until it reflects like a mirror.  If you can see your reflection clearly in your doorknob or kick plate, for example, it is safe to say that it is a polished finish.  I have included a raw photograph of a polished finish in the lower right hand corner of the photo below.

The opposite of a polished finish is a satin finish. You cannot see your reflection in a piece of hardware with a satin finish without quite a bit of imagination.

Below is a chart showing the most common finishes with their U.S. and BHMA finish codes:

Common ANSI (US) and BHMA finishes and finish codes.

Common ANSI (US) and BHMA finishes and finish codes.


Notice there are several finishes that might be described as slightly luminous shades of gray. Right here is where the most trouble is with finishes. In particular there are US15 (BHMA 619 or 646) satin nickel plated, US15A (BHMA 620 or 647) antique nickel plated, US26D (BHMA 626 or 652) satin chrome and US32D (BHMA 630) satin stainless steel. There are subtle differences between them. Of these four, US26D is the lightest shade of gray whereas US15A is the darkest. In between are US15 and US32D, and between these two US32D is just slightly darker. To the untrained (or uncaring) eye these four finishes may appear exactly the same, but all it takes is the installation of an antique nickel lever on a door right next to another door that has a satin nickel lever on it to earn somebody an expensive paperweight.

The other finishes are much more easily distinguishable:

  • US9 (BHMA 611 or 637) bright bronze (not shown above) is not a very common finish, but easy to identify. It’s like a copper penny where the Lincoln’s face has been buffed clean off, and now you can clearly see your face instead his reflected in the penny.
  • US10 (BHMA 612 or 639) satin bronze is a copper color, like a new penny, buffed to a satin finish, does not reflect images clearly.
  • US10A (BHMA 616 or 643) brown with a little red in it. Not commonly used in locks, but common in hinges. Not reflective. A “living” finish.
  • US10B (BHMA 613 or 640) plain brown, not reflective. A “living” finish.
  • US26 (BHMA 625 or 651) polished (or bright) chrome. Silver in color, you can see yourself clearly reflected.
  • US3 (BHMA 605 or 632) polished (or bright) brass. Gold in color, you can see yourself clearly reflected.
  • US4 (BHMA 606 or 633) satin brass. The same yellow gold color as polished brass, but does not reflect images clearly.
  • US5 (BHMA 609) antique brass. Same as satin brass except with black accents.
  • US32 (BHMA 629) polished stainless steel. This mirror finish is similar to US26 above, but just slightly darker. As with satin chrome and satin stainless, it can be difficult to distinguish between polished chrome and polished stainless. If it is an exterior application or a corrosive environment it is probably stainless.
  • USP (BHMA 600) prime coat over steel.  Hinge has been painted with gray primer and is ready to paint.

Using a Camera to Identify Door Hardware Finishes

As you can see by my photo of a manufacturer’s sample of US26 bright chrome at right (and in the photo above), it is very hard to tell reflectivewhat the finish is by looking at this photo.  This is because it has a mirror-like finish that reflects back all the colors that are in the room.  Yet actually most finishes have a degree of reflectivity that will show up in photos.  All in all it is a lot easier to identify the finish yourself on the job while looking at finish samples than to send a photo of the item to, for example, your hardware dealer for identification.  Most established door hardware manufacturers have brochures that accurate depict an assortment of finishes.  Using their pictures to identify the finish is like having access to their professional photographer.  Why would you try to use your phone camera when there is a professional photographer at your disposal?

About “Living” Finishes

Living finishes are finishes that are designed to age naturally over time, such as US10B, oil rubbed bronze. The oil rubbed bronze finish seems to come out of every factory a little differently each time. Often on a large job done in US10B finish you will find that all of the hardware is, in fact, the same finish, yet it is all slightly different in color. This is not usually avoidable. Also individual hardware items with living finishes will age differently over time depending on use and slight differences in how the finish was applied at the factory. US10B hardware that has been around a while may end up looking like bright bronze, satin bronze, satin brass or antique brass.


The Scary Spec

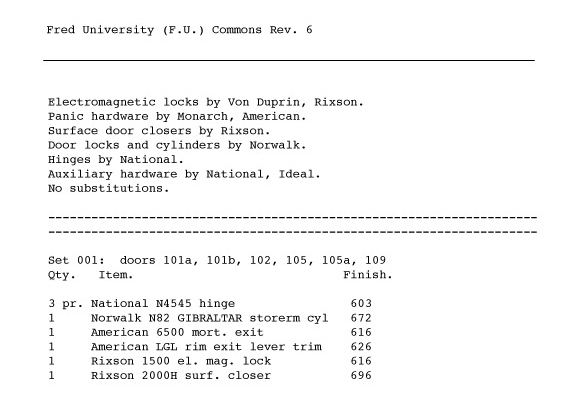
hellspec

If you are a door hardware professional you’ve seen them: the stupid specification, the dumb door schedule and the hardware take-off from hell. If I had a penny for every dollar I’ve saved customers by debunking bad specs, I’d probably be a gazillionaire today.

Where do they come from? There are a couple of sources. One is software problems – i.e. bad software or architects who don’t know how to use their software. Another is ignorant or incompetent architects. A third is inept or misinformed hardware consultants. However, what really allows the bad hardware spec to go forward is lack of communication.

Dysfunctional Software, Architect or Industry?

I was working with a systems integration company on delayed egress systems for schools in St. Louis. The salesman from the integrator sent me the door schedule from the architect and right away I noticed that there were two electromagnetic locks on each door. “This spec won’t work,” I said to myself, but when I called the salesman, he replied in the typical attention-deficit manner of many salesmen, “Listen, I don’t care, just price it out and send me the quote. The bid goes up in an hour.”

Since Murphy’s Law was written by a locksmith named Murphy with the hardware industry in mind, this fool of a salesman won the bid and the project manager and I were left to figure out what the architect may have meant. I spent some time trying to devise a system of relays that would allow the redundant locks specified for every door to work together more or less in compliance with life safety and building codes, but the more I tried to make the cockamamie conglomeration of hardware fit the application, the more I realized I needed to speak to the architect and find out what he had in mind.

Perhaps because the project manager was afraid that my company – a hardware distribution company – would sell to his customer direct, he would not give me the architect’s contact info. Luckily, as I had him fax me more and more documents to try to figure the spec out, he finally sent me one with the contact info on it by accident.

When I called the architect it turned out that the new software he was using did not delete the old hardware when he added the new hardware. Half the hardware was on the spec by accident. After the architect removed the redundant hardware (with a little help from me) the spec was rewritten and the job went forward with few problems, all because of a little communication.

Electrifying

A project manager called me to get a quote on about twenty fail safe electric strikes. He said that he needed fail safe because the doors needed to be unlocked in the event of a fire to comply with life safety code. So, naturally, I asked the obvious question: “Are these fire doors?”

“Yes, they are,” he replied.

“Then the strikes must be fail secure, not fail safe,” I said.

“But they can’t,” he countered. “The Fire Marshall said they had to be unlocked if the fire alarm went off.”

“Ah,” I said. “Are these stairwell doors?”

“Yes!” he said. “They are all stairwell doors.”

Of course, stairwell doors are fire rated because a stairwell tends to become a chimney in a fire. So they must remain positively latched. Yet, because they are stairwell doors, life safety code dictates that at least some of them (it varies by locality) must be also unlocked.

There are two ways to lock a fire door so that it is both positively latched and unlocked in the event of a fire emergency. It can be done with an electric lock or with an electromagnetic lock; it cannot be done with an electric strike because an electric strike works by releasing the latch bolt of the lock. If the latch bolt is released, the door is not positively latched.

In this small conversation I may have saved the project manager’s company several thousand dollars or maybe more. If, for example, I had asked no questions, but simply quoted and subsequently sold him the electric strikes he asked for, and then his technicians installed them, and then the Fire Marshall demanded they all be removed, at the very least the strikes would have been non-returnable. At worst, the Fire Marshall might have demanded that they replace every door frame they cut to install an electric strike, because the letter of the building code says that a fire rated door frame can only be altered in a fire rated door shop. In short, I saved that project manager from a potential hardware fiasco.

In conclusion, the hardware you choose as an architect, project manager or security professional is no joke. So take your time, and take it seriously. A moment of careful consideration can avoid major problems. Remember, when it comes to hardware, “Whatever can go wrong will go wrong.”


Tags