You are currently browsing the Door Hardware Genius posts tagged: security hardware


Ligature Resistant Door Hardware

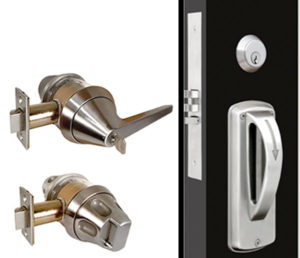
Left: Marks USA Lifesaver series. Right: TownSteel MRXA series.

Ligature resistant, otherwise known as anti-ligature or behavioral health door hardware is designed to make it difficult for folks to use it for suicide by hanging or otherwise harming themselves or others.  Pictured adjacent are cylindrical knob and lever locks by Marks USA and a mortise lock by TownSteel.

All are designed to resist attempts to hang oneself.  The cylindrical lever and knob locks feature more or less conical designs that cause a cord to slide off of them regardless of how one might try to tie it on.  The lever turns freely even when locked, achieving the same result.  The mortise lock uses a conical cylinder collar and sloped trim to achieve ligature resistance.  The opening in the pull is closed by a steel plate, making it impossible to pass a cord through it.  The exposed fasteners are security fasteners that require a special tool to loosen, and they fit flat and flush to the escutcheon and lock front.

When you sell or install ligature resistant hardware it is best not to modify the product in any way, because in doing so you will assume all responsibility for anything that happens as a result involving the hardware.  This can include disassembling a cylindrical lock to rekey it.  For this reason I recommend that when keyed anti-ligature locks are specified they are specified as interchangeable or removable core locks.

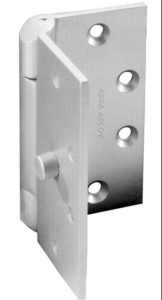
Ligature resistant hinges have hinge tips called “hospital tips” that are sloped to discourage suicide attempts (see McKinney hinge adjacent).  Security screws also help keep folks safe by making it difficult to use the hinge to hurt oneself or others.   Select Hinge offers a little gem called the “Tipit” for continuous hinges that makes continuous hinges ligature resistant.

Increasingly I field inquiries for ligature resistant door closers for butt or offset hung doors, but to my knowledge there is no such animal as of this writing.  Various factory tech support people have recommended overhead concealed security closers for ligature resistant applications, and this seems to be the consensus at this time.

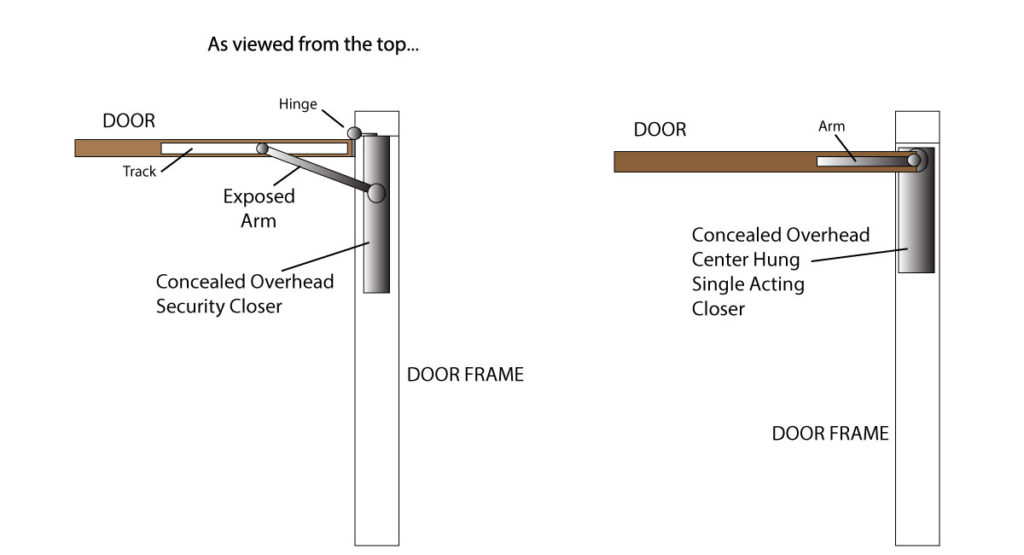
I believe that using doors that are center hung with single acting, concealed overhead or floor closers would be safer and would eliminate the need for anti-ligature hinges; but this is impractical for retrofit applications where butt or offset hung doors are already present in abundance.

In the illustration below I show why I feel a center hung, concealed, single acting door closer would be the best choice for ligature resistance.


In door hardware, safety is the most important consideration.


locksnsafescom

Your source for quality security products with superior service!

The Time-Out Room

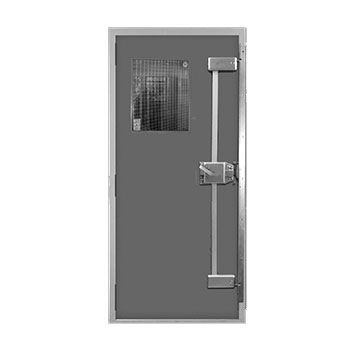
DormaKaba Stanley Best SSRL seclusion room lock.

The “Time-out Room,” also called a “Seclusion Room,” is, perhaps, a sign of our times. The purpose of a time-out room in a middle school or elementary school is to temporarily segregate an out-of-control student from the rest of the school population.  As you can imagine, the use of a seclusion room is heavily regulated, and regulations vary from state to state, city to city, and even institution to institution.  However, there are some common rules.  For example, such rooms are required to be equipped with a means to see and communicate with the student while they inside the room; the room must be free of objects and conditions that might be potentially dangerous; and the door must be unlocked from the inside.  The room must also be large enough for the student to lie down in without touching a wall, and must have a high enough ceiling that the student will not have to bend.

The purpose of the room is to let the student cool off and calm down before rejoining the school population.  It is not a holding cell.  Its purpose is less as a punishment than a behavioral tool.

What stops the student from leaving the seclusion room?  A person keeps them in.  A person must be present to observe and make sure the student is safe.  I venture to say that same person is the one who gets the student into the room in first place and keeps them there.  With no great stretch of the imagination, one might foresee instances in which the student to be secluded might be significantly bigger and stronger than the person responsible for keeping him and others safe.  It might be physically impossible for the responsible person to keep the student in the room.  They might need help.

The answer could be to put someone large, strong and well-versed in non-lethal martial arts with the patience of a saint in charge of the seclusion room duties, or it could be to use some kind of locking device to keep them in.  But, wait!  You can’t lock them in.  It’s against the rules.  How do you solve the problem?

Often the answer is an electromagnetic lock controlled by a normally open, momentary contact switch.  The magnet is only activated when the button is pressed.  As soon as the responsible person takes their hand off the button the mag lock is unlocked.  Often, local or institutional rules governing seclusion rooms require a time limit on seclusion.  One could add a timer to the system that would automatically release the electromagnetic lock after the permissible amount of time has expired.  Life safety code would demand that the magnetic lock be disabled by the fire alarm.

Pictured above is the Stanley Best SSRL seclusion room lock as seen under the Behavioral Health Products section at the bestaccess.com web site.  One must stand there and hold the lever in position to temporarily secure the door.  In photo we can see that the door is a hollow metal door in a hollow metal frame, and the door has a lite kit in it with wire glass.  I’ll bet it’s a heavy gauge, reinforced steel door, too, judging from the three-point locking version of the SSRL shown.  Clearly they expect trouble.  Through the window they can observe the student and make sure that they are safe.

Since we can see the knuckles of the hinges we know the door swings out.  This eliminates the need for a ligature-resistant handle on the inside of the door.   We’ll talk more about ligature-resistant hardware soon.


Sometimes you just need a little time.


locksnsafescom

Your source for quality security products with superior service!

Electric Hinge vs. EPT (and oh yeah, Molex)

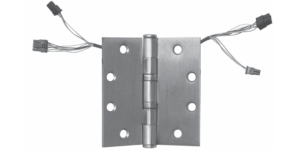
McKinney Electric Thru Wire Hinge with Molex connectors

I was taking a class on Molex connectors a while ago and the teacher – a manufacturer’s representative from a major hardware manufacturer – expressed the opinion that for high traffic applications, a power transfer is preferable to an electric thru wire hinge.  I confess that until that moment I had not actually thought about it much, but what he said made a lot of sense.  After all, almost everyone prefers an electric hinge to an EPT because of the relative ease of installation.

But the rep made a good point.  The wires that run through an electric through an electric hinge are pretty thin – usually 24 or 26 gauge wire – and every time the door is used these wires are bent back and forth.  If you’ve ever bent a copper wire back and forth in your hands until it breaks you will know what I’m getting at here.  When you bend a copper wire back and forth, over and over, first it heats up, then it breaks.  The same process is going on in the knuckle of that hinge.  There’s a whole lot o’ twistin’ goin’ on.

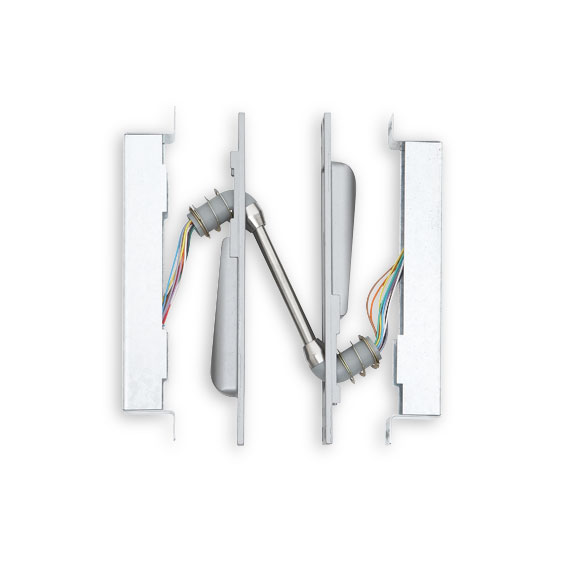
Von Duprin EPT10

When you open a door equipped with an EPT, however, there is less twisting happening.  The wires must still bend with the motion, but only a fraction of the bending that occurs with an electric hinge.  That’s why the rep always recommends EPT’s over electric hinges if the opening is to have any serious traffic through it.  Sure, installing an EPT is a lot more work, but a callback to replace a failed electric hinge is at least as much work, especially considering travel time.

Yes, you’re right, I did mention Molex connector class.  A few times now I’ve run into applications where the installer wants to convert a regular removable mullion into an electric mullion so they can install an electric strike on the mullion.  Since the advent of the surface mounted electric strike for rim exit devices, it was inevitable that someone would want to do this.  The problem?  What do you do with the wire at the header?  Well, if you just run a continuous wire, the mullion is no longer removable, is it?

But, aha!  I said.  We’ll use a Molex connector at the header.  What is a Molex connector, you ask?  Those would be those plastic connectors attached to the ends of the wires on the McKinney hinge above.  Molex is a company that has created a system of plug-and-play wire connectors, and these connectors are becoming more and more common in the door hardware industry.  Major door hardware manufacturers are now incorporating Molex connectors into all their electrified products and offering what are in effect extension cords with Molex connectors.

So a couple of connector-equipped extension cords would solve the problem of the suddenly non-removable mullion, right?  Well, not so fast, buckaroo.

This is what I learned in Molex class.  In Molex connectors, which connector will connect to what other connector is determined by the pin crimped onto the end of the wire.  They give them genders, “male” and “female”, because the male can be inserted into the female.  Okay, great.  Where is the problem?  The problem is that as of this writing, door hardware manufacturers’ extension cords all have connectors of the same gender on each end, so you cannot plug them into each other.  They will only plug into an electric hinge or EPT that has Molex connectors.

The solution to the DIY electrified mullion problem:  make your own DIY Molex connector for the wire in the header.  To do this you will need a standard wire stripper, some 12-conductor cable, the special Molex crimping tool, Molex connector housings, and Molex male and female pins.  There is a service kit available that contains all these parts.  It is a fairly time consuming process to make your own Molex connector, and it requires skill, but it is the only solution that I know to the mullion problem.

Get your surface mount electric strike with Molex connectors (several electric strike manufacturers offer these) and an extension cable from Assa Abloy or Allegion to get the wire from the strike to the top of the mullion.  Now you have the capability to connect your makeshift electrified mullion into the connector you must make.  You can attach your homemade Molex to as long a cable as you like – long enough to reach the power supply or access control panel.

Does this solution comply with code? I do not know. Best check with your local AHJ before embarking on your Molex DIY mullion adventure.

Why is the industry moving to Molex connectors?  They do not fall off, look ugly, or take up a lot of space like wire nuts, and if you need to trade out an electric hinge or electric strike they sure do make it a whole lot cleaner and easier.


That’s right. As usual, it all comes down to sex.


locksnsafescom

Your source for quality security products with superior service!

The Wacky World of Wireless Access Control Locks

Wireless access control locks are at the leading edge of door hardware evolution, creating hybrid devices that are both credential reader and locking hardware all in one. Some of these locks are designed to integrate with existing access control systems without the need to run cable back to the panel from the door; others interface with their own software on the end user’s computer or computer network using a wifi gateway.

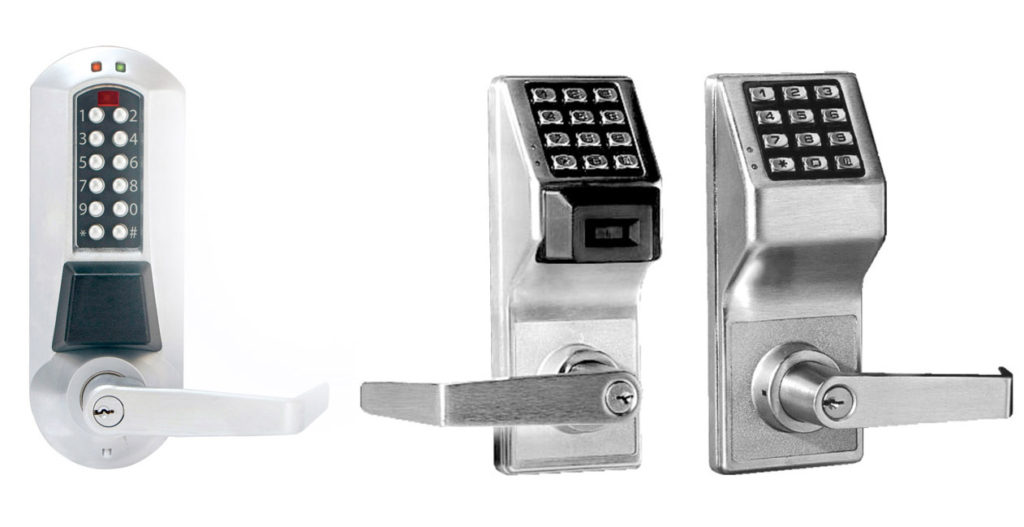
Left: Dorma Kaba Eplex ………… Right: Alarm Lock Networx

The Independent Systems

Alarm Lock and Dorma Kaba are two manufacturers that offer wireless access control locks with proprietary software designed only to control and monitor these locks.  This represents a step up from standalone programmable locks that needed to be visited with a notebook computer or handheld programmer for programming and audit trail download purposes. The locks connect via a wireless router or gateway to a single PC or to a server on the end user’s computer network.

The Alarm Lock Networx product can also be integrated into a few access control systems; see the Alarm Lock Networx web site for details.  The Dorma Kaba wireless Eplex lock is compatible with Dorma Kaba E-Enterprise software.

These independent solutions are good for folks who want to upgrade from mechanical locking systems to electronic access control, offering full featured access control capabilities, near-instantaneous reporting and monitoring and requiring very little wiring to install.

If, however, the end user has an existing access control system that they would like to expand, using the Alarm Lock Networx software or Dorma Kaba E-Enterprise software would mean adding a second access control system – a complication many end users would like to avoid.

In the past, when a facility wanted to expand their access control system their access control company would be called in to run wire and install credential readers and the door hardware installer might be called in to install electric locks or strikes to be controlled by these new readers. Today, however, the door hardware installer can install wireless access control locks that can be integrated into the end users existing system.

But wait! Not so fast, there, champ.

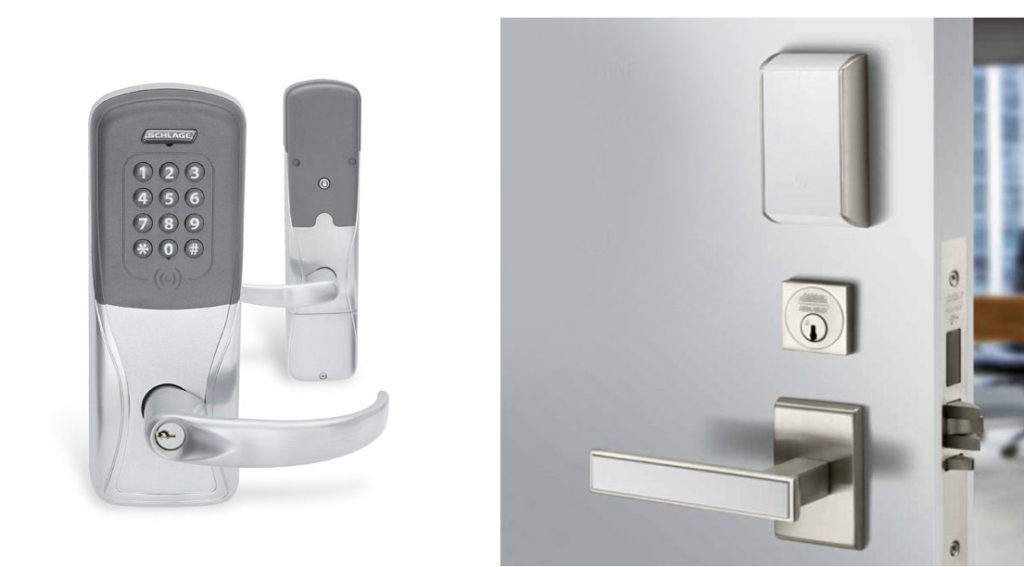
Left: Schlage AD-400 ………. Right: Sargent IN120

The Integrators

Allegion and Assa Abloy are two major lock manufacturers that offer wireless access control locks that integrate with existing access control systems. This means that the end user can program these locks using the same access control software they are currently using.

Using the Allegion AD series wireless as an example, a single interface panel can allow up to sixty-four of these locks to the panel. There is actually some wiring involved with wireless locks: the interface panel (or wifi gateway) must still be wired to the main access control panel. This is the great attraction: that one can greatly expand an access control system without spending a lot of time and money on wiring. A wire is run from the access control panel to the interface panel in a distant wing of the building, and then the interface panel (or a few of them) communicate with all the locks in that wing.

Conflict arises from the very fact that these locks are designed to integrate with existing systems. Over the last several decades, access control systems have become big business. Traditionally, for every door in the system, the access control company sells a reader. In addition, an expansion module may be needed at the access control panel. If we install sixty-four wireless locks and integrate them into the existing access control system, it can be said that we just deprived the access control company of the sale of sixty-four readers.

Access control does a lot more than control access these days. Access control, environmental control systems, fire and security alarms, elevator control, employee time and attendance, student meal plan administration and other systems may all be incorporated into the same system, run by enterprise level software on a server on the end user’s computer network. You might say the access control company that owns the rights to the software and manufactures the access control panel is in a very secure position. Extricating one access control company to replace it with another could be a monumental task, involving every person whose life the system touches.

What can access control manufacturers do about these wireless locks being attached to their systems? Plenty. They can update their software so that these locks are incompatible. They can charge the end user a licensing fee for every lock that is added. In short, they can make the addition of wireless access control locks to their system expensive or impossible.

Both Allegion and Assa Abloy have made agreements with access control manufacturers that allow their products to be added to existing access control systems. Allegion has a range of agreements with various manufacturers limiting to whom Allegion wireless access control products can be sold. In many cases Allegion wireless products can only be sold to the access control company with whose system they will be integrated. Assa Abloy wireless access control locks can only be sold to their designated Certified Integrators. It is through these channels that wireless access control locks make it onto job sites.

Because of these sales limitations, bidding on jobs that specify these kinds of locks can be complicated. Bidders often find they must exclude specified wireless access control locks from their bid because they are unable to buy them. In the case of Assa Abloy products, some bidders may elect to take the online course and become a Certified Integrator. In the case of Allegion, they might be fortunate enough to be bidding on a job in which the access control manufacturer has no agreement with Allegion, and the job can therefore be freely bid. In either case, however, it is a more complicated process than simply pricing out a piece of door hardware.


Evolution or intelligent design? Wait, did you say, ‘intelligent?’


locksnsafescom

Your source for quality security products with superior service!

Field Reversing the Precision E2203 SVR Exit Device

The Precision E2203 is a Surface Vertical Rod exit device with a solenoid in the head that controls the outside lever trim.  Ordered complete with trim: part number is E2203 × 4908A, specify door width, finish, handing, fail safe or fail secure.  The right thing to do is to order it fail safe or fail secure and handed at the factory for your application. 

But… let’s say for the sake of this article that you ordered the device and did not specify handing or fail safe / fail secure. You might find yourself needing to field reverse the handing.  Here is what you need to know.

Handing

Changing the hand on the basic 2200 device is not very difficult, but changing the hand on the E2200 is fairly difficult, and requires skill, patience and … tape.
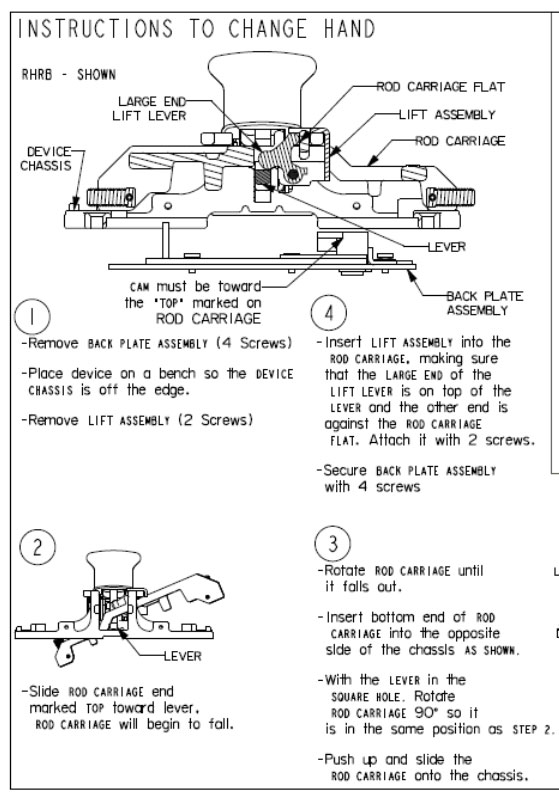
For the non-electric, purely mechanical version of this device, changing the hand is not as simple as it is with some other exit devices, for example, flipping the device over, but it is not all that hard to do.  Below are the directions for field handing excerpted from the 2200 Series installation instructions from the Stanley Precision web site.   Why they have arranged the steps to be followed in counterclockwise order is a mystery to me, but I am not here to judge, just inform.

At a glance you can see that there is some disassembly of the exit device head required to change the handing of the device. But when you add electrified trim control it complicates things a bit.

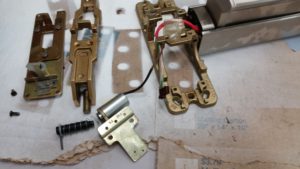
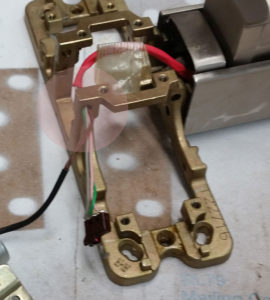
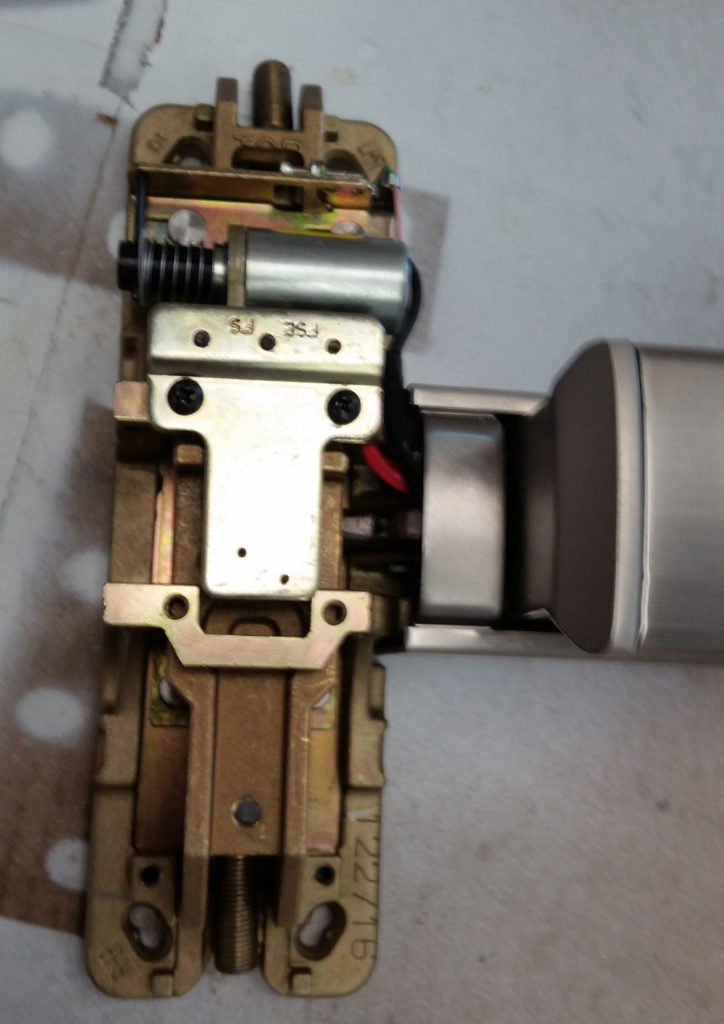
In the photo below you see the wires for the solenoid where they pass through the hole in the bracket.  That bracket is an integral part of the active head and it does not move.  However, the solenoid must be installed at the other end of the active head in order to interface with the working parts of the device and the wires are just long enough to allow it to be installed where it is.  There is no play in the wire that would allow the wire to remain where it is and yet allow one to move the solenoid.


In order to move the solenoid to the other side of the active head, one must either cut the wires (a nightmare, do not do it) or to completely disassemble the exit device, bar and all.

Why do you have to completely disassemble the exit device to pull the wire through?  Because it is taped to the baseplate of with a piece of filament tape that runs the length of the bar.  The tape must be removed to free the wire so you can pull it out through the hole in the bracket.

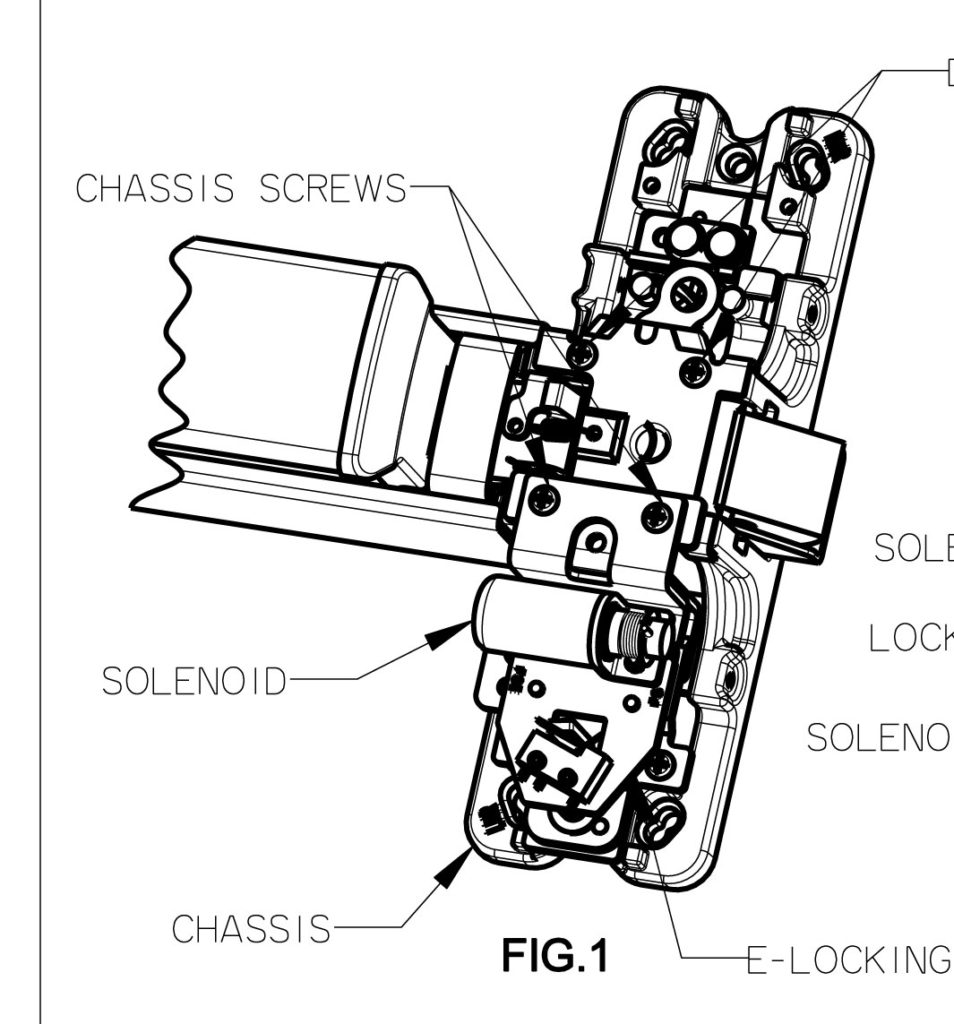
I could not find the directions for changing the hand of the E2203, but here is a drawing of the solenoid placement for the E2103 rim exit device taken from the installation instructions from the E2103 Kit.


Once you have pulled the wire through the hole, changed the hand of the head, taped the wire back down the length of the bar baseplate and reassembled the device, you’re done.

Below is a picture of the E2203 with handing freshly changed and the device reassembled and ready to install.


Like I said: order it fail safe or fail secure… AND ORDER IT HANDED.


locksnsafescom

Your source for quality security products with superior service!

Choosing a Delayed Egress System: Self-Contained, or Built from Components?

Delayed egress is a process that delays unauthorized exit from a space while complying with NFPA 101 life safety code.  Use of this process is strictly regulated with the help of building inspectors and fire marshals across the United Sates.  With that in mind it is always a good idea to get your local AHJ (Authority Having Jurisdiction) on board whenever you are planning to install delayed egress on an opening.

When you beginning planning your delayed egress system you will find that many systems on the market are self-contained.    These could be delayed egress electromagnetic locks or electrified delayed egress exit devices.

Here are some examples of self-contained delayed egress maglocks:

  • SDC 1511S
  • Schlage Electronics M490DE
  • Dynalock 3101C

Here are some examples of self-contained delayed egress exit devices:

  • Detex V40 EE
  • Von Duprin Chexit
  • Sargent Electroguard

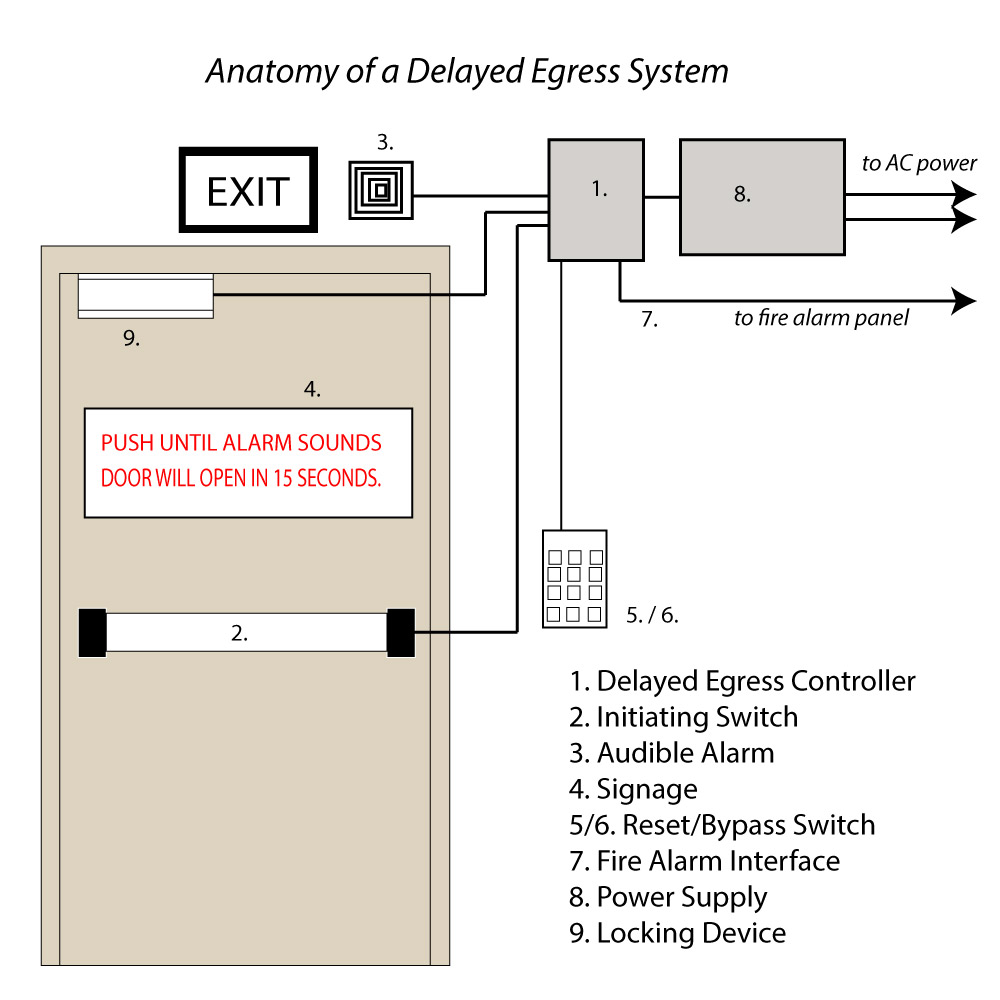
delayed-egress-anatomy
Almost all delayed egress systems are made up of the same components:

  1. Delayed egress timer and relay logic board
  2. Initiating Switch (to initiate the delayed egress process)
  3. Audible alarm
  4. Signage
  5. Reset switch
  6. Optional bypass switch
  7. Fire Alarm interface
  8. Power supply
  9. Locking device

Therefore it is possible to construct a custom delayed egress system from components.  Later I’ll talk about why you might want to choose a built-from-components delayed egress system instead of a self-contained one.   The following sections describe each part of a built-from-components delayed egress system.

Delayed Egress Timer and Relay Logic Board

This board is UL Listed and specifically designed to perform all delayed egress functions in compliance with life safety code.   Here are some examples of component boards for delayed egress:

  • Securitron XDT-12 or XDT-24
  • Seco-Larm SA-025EQ

The board is the brains of the delayed egress operation.  It has contacts to wire in switches for delayed egress initiation, fire alarm interface and system reset, timers to control nuisance and egress delay, and relays to control locks and notify external devices.

There are also delayed egress controllers that offer more features.  The following may include the delayed egress timer/relay board and some other required feature(s) such as the initiation switch or the audible alarm.

  • Alarm Controls DE-1
  • Security Door Controls 101-DE
  • Securitron BA-XDT-12 or BA-XDT-24

Initiating Switch

The switch that initiates the delayed egress process shares several characteristics with any request-to-exit switch.  To comply with life safety regulations it must require no prior knowledge to operate; it must require no more than one motion to operate; and it must be placed in relation to the door according to life safety standards in your local jurisdiction.  I think that the best possible initiation device is a mechanical push bar with a switch, such as the Adams Rite 8099-M or the Securitron EMB.  In a panic situation it remains obvious that to get out, one must push on the bar, and because it is mechanical it is unaffected by power outage.  If it is wired to open the contact when pushed, if the wires leading to it are cut it will initiate the delayed egress process.

In rare circumstances where it might be permitted, the locking device might be a fail safe electrified mortise lock that is locked on both sides, inside and out.  Then the initiation switch might be a palm switch next to the door.

Audible Alarm

The mandatory audible alarm sounds for 15 seconds before the delayed egress controller releases the locking device to allow exit.  It’s loudness must be between 81 and 88 decibels.  In some jurisdictions the alarm must be manually reset at the door; in others it may be self resetting via timer or door position switch.  Yet another reason to have a heart-to-heart talk with your local AHJ when designing your delayed egress system.

Signage

The wording on the mandatory sign must comply with life safety code.  There are minor variations in wording.  I suggest buying a sign that is part of a delayed egress system.  The sign that comes standard with the Von Duprin Chexit is readily available as a separate part.

Reset Switch

As mentioned in the “Audible Alarm” section above, a delayed egress system reset switch located at the door is mandatory in some jurisdictions.  Check with your local AHJ.  In some jurisdictions delayed egress systems are allowed to be reset by remote switch or other means, such as a door position switch.

Any kind of momentary contact switch will do the reset switch job, but delayed egress system reset switches located at the door almost always require some kind of security to prevent unauthorized resetting.   Standalone keypads or key switches are often used for this purpose.  Delayed egress systems can also be integrated into existing access control.

Optional Bypass Switch

Not required but often needed, the optional bypass switch allows authorized personnel to exit without triggering the delayed egress system.  Again, any momentary contact switch will do, but usually some security is required.  If you are using a keypad as the system reset switch and the keypad has more than one relay, you can program the second relay to be the bypass switch.

If access from the exterior side is required a bypass switch is required on that side.  Sometimes security is not needed from the exterior side.  In that case a simple momentary contact pushbutton will do the job.

Fire Alarm Interface

The mandatory fire alarm interface allows enables fire alarm panel to deactivate the delayed egress system immediately in the event of a fire alarm.  This is an integral part of the life safety code that allows a delayed egress system to exist.  Therefore, if your building does not have a fire alarm panel, without special permission from the local AHJ you cannot have a delayed egress system.

Power Supply

All delayed egress systems I have had experience with run on low voltage power that comes from a low voltage power supply.  Generally delayed egress systems require regulated and filtered power at 12 or 24 volts.  Delayed egress controllers draw very little current, but as will all electrically operated systems, the current draw of all attached devices must be taken into account when selecting a power supply.

Locking Device

The locking device must be electrically locked and fail safe from the egress (interior) side.  The most frequently used locking device in a component based delayed egress system is the electromagnetic lock.

Why Build a Delayed Egress System?

Why would you put together a delayed egress system from components when there are so many good self-contained systems?

  1.  To Save Money.  Piecing together a delayed egress system can be significantly cheaper than buying a self contained delayed egress system.
  2.  To take advantage of existing hardware.  For example, if there is already an electromagnetic lock on the door, adding the other components is relatively easy.
  3. Conditions at the door prohibit use of a self contained delayed egress system.  For example, door size or the presence of existing hardware may require the installer to seek a more creative solution.


Bottom line, unless you have a prison, you cannot lock ’em in.  Well, not without permission.  🙂
Door Hardware Triage

The Medical Metaphor

medicalAs previously published in Doors and Hardware Magazine, Feb. 2016

As in the medical profession, correct diagnosis of door hardware problems is wholly dependent upon the knowledge, skill and powers of observation of the person whose job it is to correct the problem.  “The devil is in the details,” they say, and it is never truer than when said in reference to doors and hardware.

Another old saying, “ignorance is bliss,” can be liberally applied to who those innocent building occupants and visitors who think that the answer to a lock that is not latching is to slam it until it does – or until the hardware falls off, whichever comes first.  Yet by the same token, door hardware technicians who fail to look at door hardware problems holistically are equally blissful.  If you have ever seen the latch hole in an ANSI strike enlarged to include half the head of the bottom mounting screw in order to remedy what is clearly a hinge problem you will understand what I am talking about.

The above occurs because the technician sent to solve the problem is guilty of treating the symptoms while failing to diagnose the disease.  He or she observes that the latch is making contact with the strike too low to drop into the strike hole as it should, but does not question why this is happening.  This example is a simple one, but the principle applies to more complex problems as well.

Method

A great way to make sure you correctly identify a door hardware problem on the first visit is to have a consistent method of examining the total opening.   An example follows:

  1. If possible, speak with the person who has reported the problem, or better yet, meet with them at the opening so that they can show you what the problem is.
  2. As you approach the door, visually check the gap around the edges of the door on the top and both sides.  (The gap should be one-eighth inch.)  If the gap is greater in one place and less in another, the problem may be a bent hinge or misaligned frame.
    Open the door.  How does it feel?  Does the door itself stick?  If it has a latch, is there resistance when you turn the lever to retract it?  Do the hinges groan or squeak?
  3. Inspect the door for dents and abrasions.  For example, scratches at the top of the lock-side edge may indicate bent or loose hinges.   Dents may indicate attempted forced entry:  check for damage to internal lock parts.  A dent in the gap between the door and frame above the top hinge may mean an object was placed there.  The frame may be damaged and/or the top hinge may be bent.
  4. Inspect the hardware for damage, missing parts and/or wear.   If it is a hollow metal frame, are the silencers installed?  If there are no silencers the door will not align properly and the lock will not latch correctly.  Is the door closer leaking?  Does the door closer arm move smoothly?  Are the hinge screws all present and accounted for, and are they tight?  If there is a latch, there probably is a drag mark on the strike.  Does the drag mark reflect correct alignment?

In other words, look at the door, the frame and the hardware thoroughly and completely, and always do it the same way.  That way you won’t fix one problem just to return the following week to fix another problem that you missed.strike

Tools May Be Required

To identify a door hardware problem you may find it helpful to use instruments or tools.   For example, a carpenter’s level can help you determine whether a door or frame is level or plumb quickly and accurately, and a carpenter’s square can show immediately if the frame is true or sprung.   A tape measure may be helpful to check if hardware is correctly located, whether or not the gap between door and frame is consistently one-eighth inch, and if one leg of the door frame seems to be longer than the other.

One problem most swiftly identified using a carpenter’s level is positive pressure.   If you detach the closer arm and tape back the latch on a door that is level, and it swings open seemingly of its own accord, chances are it’s a positive pressure issue.  Positive pressure occurs when the air pressure inside the HVAC ducts is greater than the pressure outside, causing air to be constantly forced out of the structure.  Positive pressure can be powerful enough to prevent a door closer from closing the door, and sometimes the only cure is when the HVAC technician changes the settings on the air circulation system.

The positive pressure issue is one of those door hardware issues that may require someone besides a door hardware technician to fix.

Waiting For The Electrician

Problems with electro-mechanical and electronic locking systems, like positive pressure issues, may require a low voltage or electronics specialist to solve in addition to a door hardware technician.  For liability reasons it is important to use technicians who are appropriately licensed as required in your locality.

Often these problems are due to mechanical as well as – or even instead of – electrical or electronic issues.  Therefore the best situation for electronic or electrical door hardware triage is when the technician called upon to fix a problem is skilled in all three disciplines. Out in the world we are finding locksmiths that have their low voltage electrical technician license and a working knowledge of how to troubleshoot or program an access control system, systems integrators who can disassemble and repair a mortise lock, and even electricians who can adjust a door closer or repair an exit device.

This is a phenomenon driven by a market that desires to have one technician who can do everything, both for convenience and economics.  In any event, a technician equally skilled in these areas solves the problem of cross discipline communication.  If you’ve ever had to explain the difference between fail safe and continuous duty electrified door hardware to someone who just does not get these concepts you will understand what I’m talking about.

For this reason alone it behooves one in the door hardware repair and installation business to learn as much as they can and get all the credentials they need to be able to service all the door hardware out there in today’s electric and electronic world.

Closure

The age of door hardware in which we work today is the age of the renaissance woman or  man, student of many skills.  However, diagnosing the often complex ailments of doors and door hardware takes more than skill and knowledge:  it requires mindfulness, openness, resourcefulness and humility.  It is not only necessary to know what could go wrong (and doubtless will, according to Murphy’s Law); it is necessary to be aware enough to observe all the symptoms, to be open to all possibilities and to be imaginative in creating solutions.  One must also have the humility to realize that it is not possible for anyone to know absolutely everything.  Sometimes the most useful tool at your disposal is your mobile phone.  A call to factory tech support can often save hours of fruitless aggravation.


No man is an island – but some men belong on one. 

The Wrap-Around Door Reinforcer

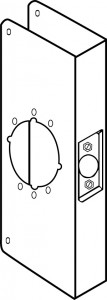
4CW2A wrap-around door reinforcer is a metal sleeve that slides over the door at the lock prep to conceal damage and/or reinforce the door.  They are a quick and handy solution when wood doors are damaged by forced entry and are often installed to strengthen new wooden doors against forced entry attempts.

In my experience a wrap does not really deter forced entry, but it does limit the damage done to the door.   I have found that when wood doors equipped with wrap around door reinforcers are burglarized, often only the wrap and the lock need replacing, not the whole door.   As with all door security hardware, if your lock is installed in a wrap-around door reinforcer and your neighbor’s lock is not, a would-be burglar may choose to break into your neighbor’s place instead of yours; however, this hypothesis is dependent on the highly dubious notion that a burglar is behaving rationally.  If the person were behaving rationally they would not risk their freedom and personal safety breaking into to somebody’s home to steal  their iPad or PC and selling it for chump change to their drug dealer.

Another benefit to using wrap-arounds is that they can act as a drill guide for lock installation.  Be careful, however, not to let the hole saw chew up the wrap.  Also, especially with stainless steel wraps, be sure not to let your drill bind up with the metal at high speed.  Injury would be likely.

Wraps are typically used on wooden doors, and while it is possible to use them on hollow metal doors, they never seem to fit quite right without a fight.  It seems that hollow metal doors measure exactly 1-3/4 inches thick whereas wood doors tend to measure closer to 1-11/16 inches.  Variations in door thickness affect the way a wrap will fit (or not fit) on a door.

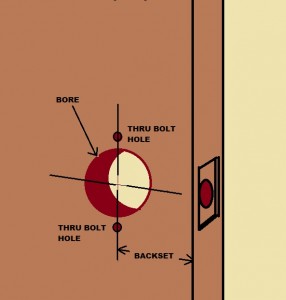
A wide variety of wrap-arounds have been created to accommodate various locks and conditions.  Don Jo Manufacturing currently carries the largest assortment, and if a new kind of lock by a major manufacturer emerges, they are pretty quick to design a wrap for it.  To get the right borewrap for your application you need to know:

  • Door thickness
  • Size of the wrap you want
  • Diameter of the lock bore
  • Backset
  • Finish
  • Through-bolt holes (yes or no)

(see illustration)

Standard door thicknesses for wraps are 1-3/8 inches and 1-3/4 inches.  Some models of wraps are available thicker doors.   Wraps come in a variety of heights, but height is usually determined by the kind of lock the wrap is designed for and the backset.  See the illustration for bore, through-bolt hole and backset details.

For other wraps you may need other dimensions.  For example, Don Jo makes a number of wrap-arounds for interconnected locks and these (naturally) have two bores cut in instead of one.   If you need a wrap for a mortise lock you may have to change the trim on the lock to make it work, or you might have to drill lever, cylinder and thumb turn holes into a blank wrap to customize it to the lock you have.  See my warning about hole saws and stainless steel above.  I earned myself sprained fingers that way once.

I used to joke about certain doors that they could use a door sized wrap.  Then some enterprising individual actually brought one by.  The idea didn’t go anywhere, as far as I know, but it was a good concept:  one wrap covered the door completely in sheet metal and another covered the frame.  Still, at that point why would one just buy a hollow metal door and frame?

And that about wraps it up.

Compact Electric Strikes

A common problem with installing electric strikes is cavity depth – that is, how deeply you need to cut into the frame (or wall) so that the electric strike will fit. For most of the twentieth century electric strikes were, and most still are, designed without consideration for this factor. Instead they are designed for burglary resistance and durability.

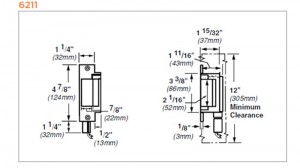
VD6211

Von Duprin 6211 Electric Strike

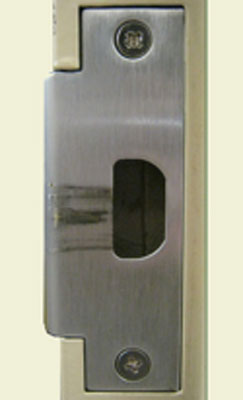
Click on  the dimensional diagram of the Von Duprin 6211 electric strike at right.   You can see that its total depth is 1-11/16 inches. All of its internal parts are heavy duty, and it has a heavy cast body and a thick, finished face plate. Most of the parts are individually replaceable. To install the 6211 in a hollow metal door frame, the dust box must be removed and often material inside the door frame – sheet rock, wood, masonry, whatever – must be removed in order to accommodate the strike. If the strike must be installed in a grouted door frame the installer is in for perhaps an hour’s worth of work that may involve a masonry drill, a 2-1/2 lb. sledge hammer, a masonry chisel and safety goggles.

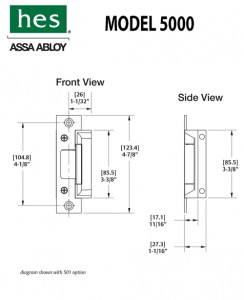
HES 5000 Dimensional DrawingsIn more recent years a new generation of low profile (shallow depth) electric strikes has become available, offering unprecedented ease of installation. The HES 5000 (illustration at left) was one of the first strikes on the scene to offer a depth of only 1-1/16 inches, and advertised that it could be installed without even removing the dust box from the frame. I have found it is usually much easier to knock out the dust box for wiring reasons, but it is true that the unit will fit neatly inside most original equipment dust boxes in hollow metal frames.

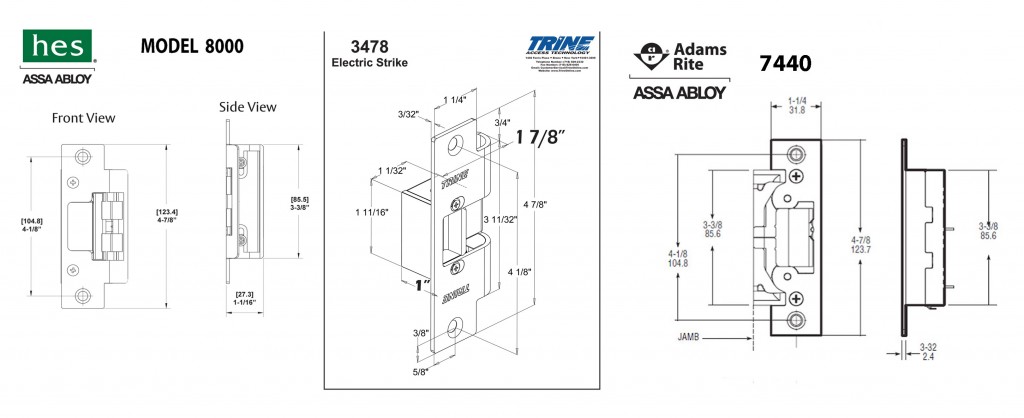
More recent offerings in the shallow depth electric strike department include the Trine 3478, the HES 8000 and the Adams Rite 7440, illustrations shown at the end of this article.  All are UL Listed burglary resistant. The HES 8000 offers 1500 lbs. holding force, the 3478 offers 1200 lbs. holding force and the Adams Rite, with its innovative double keeper design, offers 2400 lbs. of holding force.  The Trine 3478 offers an install with a very tiny lip cutout, and the HES 8000 offers the advantage of needing no lip cutout at all. Each of them fit in a strike cavity only 1-1/16 inches deep.

These strikes have revolutionized electric strike installation. Before, a good installer might install six or ten electric strikes in a day. Now a really fast installer might be able to install 20 or more, greatly reducing labor and other costs associated with installation.

What’s the Trade-Off?

None of the internal parts of these strikes are available. When these strikes break, you throw them away and buy new ones. Also they do not last as long. Whereas it is not unusual to see a Von Duprin 6211 or a Folger Adam 712 still in use after 10 or even 20 years, 6 years of service is a long time for a low profile strike. In ten years you might be replacing a spring or solenoid in a Von Duprin, but you might be installing your second or third low profile strike in the same door frame in that same amount of time. This is a small inconvenience.

Upon installing that third strike in the same hole, you probably will not yet have equaled the price of a single Folger Adam 712 or Von Duprin 6211. If price up front is the primary consideration, low profile is definitely the way to go. But if in about 12 years you are installing the fourth replacement strike in the same prep, those expensive, harder-to-install, heavy duty strikes start to look like a much better value.

strikethree

HES model 8000, Trine model 3478 and Adams Rite model 7440

Thank you.

Schlage CO and AD Series Mortise Lock Parts

Schlage AD Series

Schlage AD Series

This just goes to show that there is no substitute for field experience. In the quest to provide the best service to his customer, this locksmith went past my advice and the advice of factory tech support to find the best solution.

The locksmith inquired about a replacement latch for a Schlage CO200MS mortise lock. I called Schlage Tech Support and they said that there were no replacement parts available for that CO-200 Series mortise lock chassis; that the entire mortise chassis had to be replaced for a hefty sum and I relayed this info to the locksmith. The locksmith, however, knew that Schlage advertised that the CO series locksets incorporated the Schlage standard L-series lock chassis “for durability and dependability.” Based on this, the locsksmith took a chance, went to the parts list for the L-Series mortise lock with the same function and ordered the replacement latch. He reports that is identical and works fine.

Good to know! One can assume that many parts from the L Series mortise lock with the same function will work in all AD and CO series mortise lock bodies. Like I said, you learn something new every day.

Thanks for stopping by.


Tags